Think about your hands for a moment - which parts of them do you feel are most critical to your recorder playing? My bet is you mostly consider your fingers and left thumb - we naturally see these as doing most of the heavy lifting. But what about the digit which literally does the heavy lifting - your right thumb? We often take this one for granted - after all, it doesn’t have a hole to cover, so it somehow seems less important, doesn’t it? This message from Richard, one of my Score Lines subscribers, got me thinking, and made me realise our most neglected digit deserves a blog post of its own!
“Much has been written about technique but strangely little is mentioned about the right thumb. Indeed, I never thought about it other than to recognise that it supports the instrument. I was experiencing some difficulties with bottom F - my hand and fingers are not as nimble/flexible as they were - and I began to think about whether altering the position of my right thumb was an issue. Was it optimally positioned - indeed what do experts advise? I found nothing!”
A supporting and enabling role
In common with most woodwind instruments, the right thumb’s role in recorder playing is mostly a matter of support - only on the bassoon does it also have to cover a hole or press keys. This digit’s job is a supporting and enabling one - namely holding our instrument up and ensuring our other thumb and fingers can do their tasks easily and efficiently.
There are two main considerations for your right thumb - using it effectively to support the instrument and the way its position affects your overall hand shape. Both of these have an impact on the ease and level of success with which you play. Placing your thumb in the wrong place on the back of the recorder can have a detrimental effect on your playing, and sometimes result in discomfort too.
Fundamentally, your right thumb is there to support the recorder, thus enabling your fingers to cover the holes and to move freely at all times.
In search of the perfect hand position
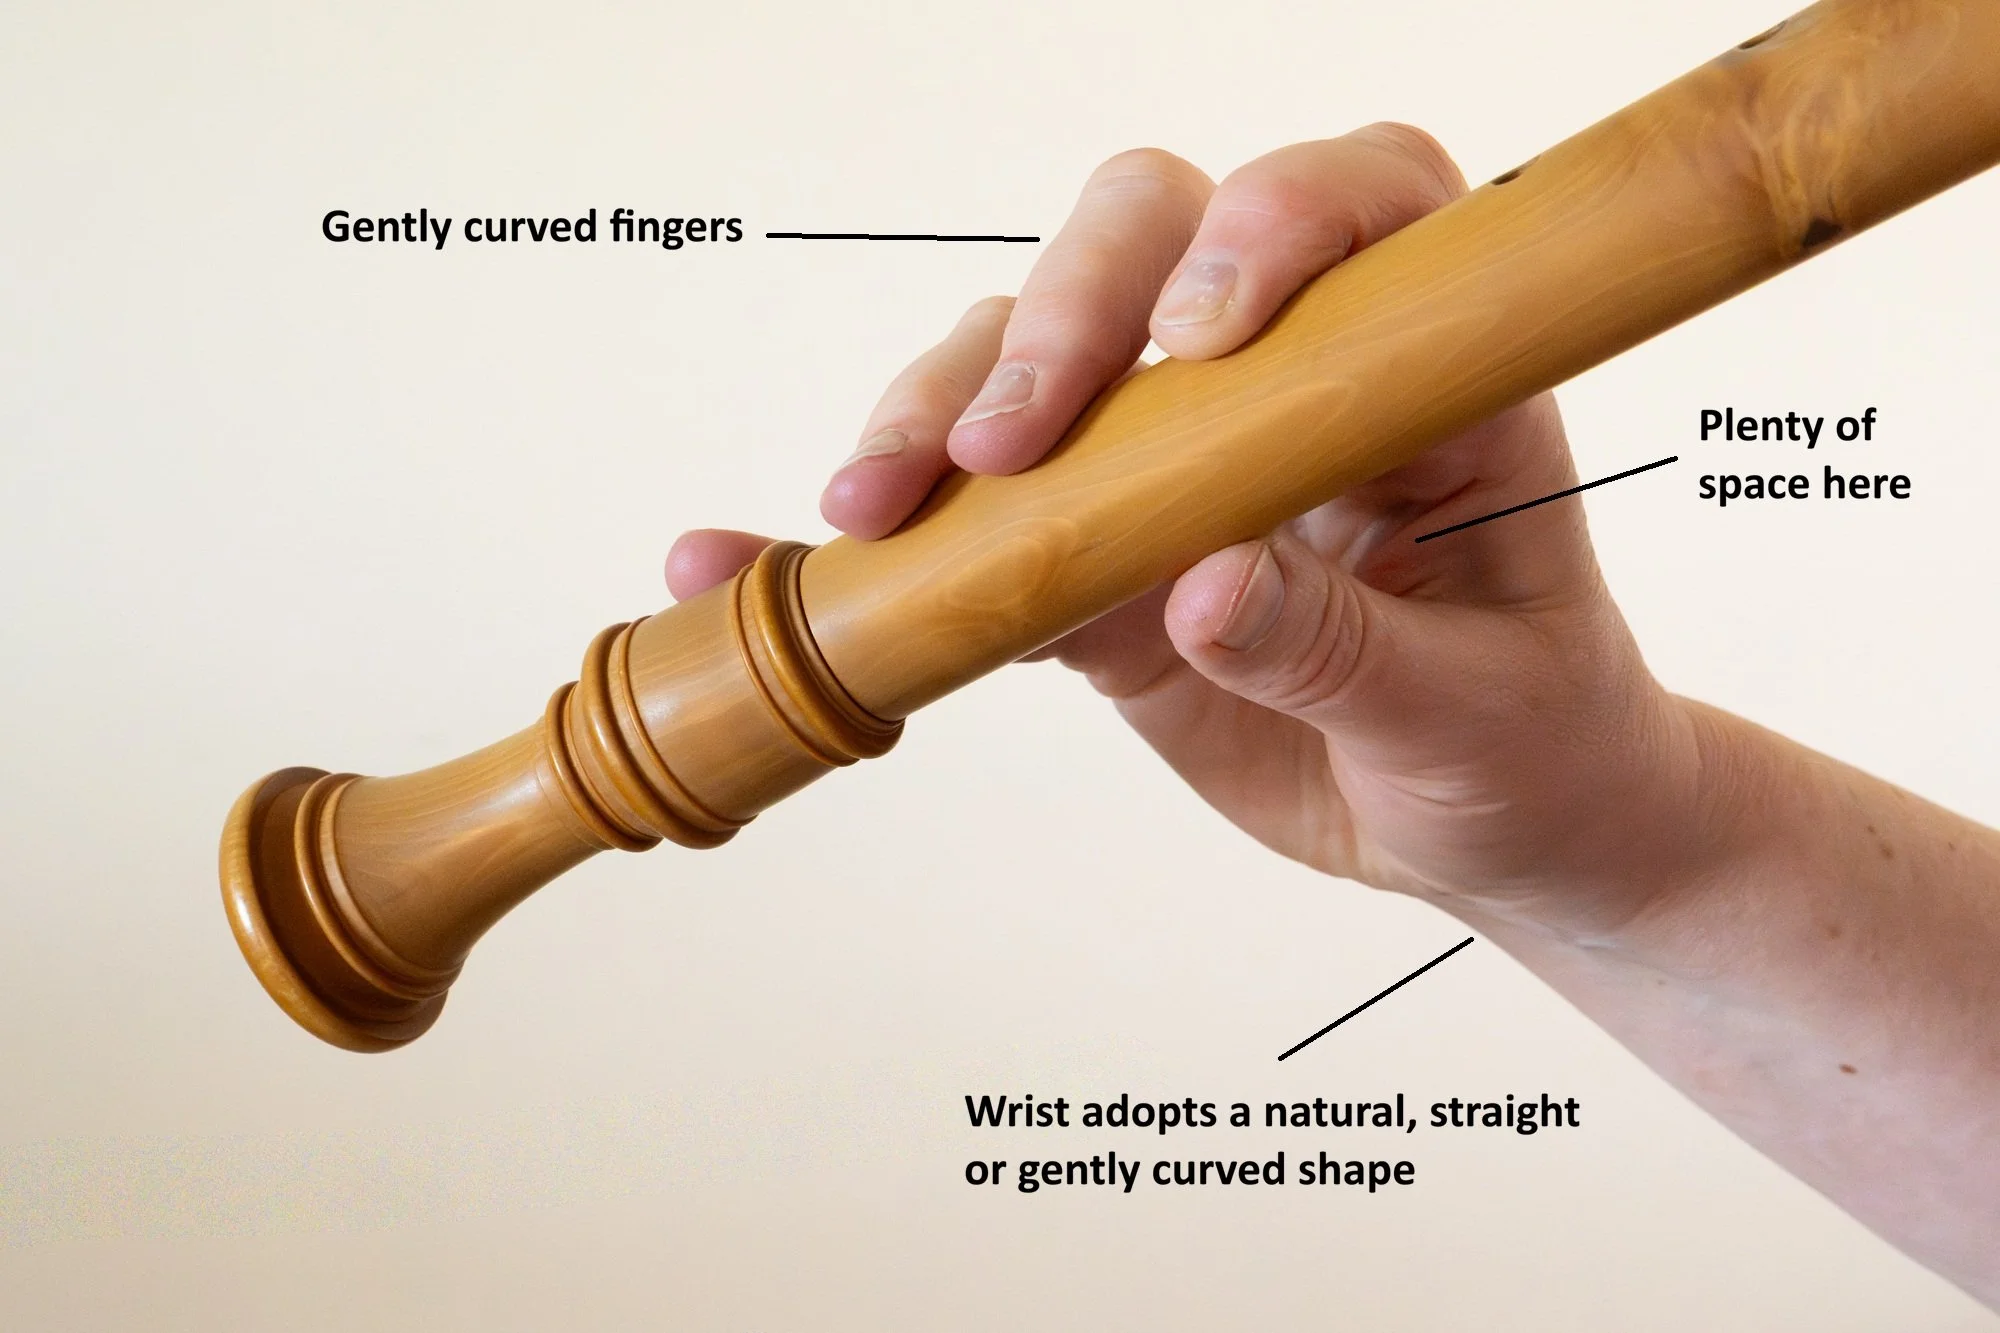
You may well be familiar with this image, taken from Principles of the Recorder, Flute and Oboe by Jacques Hotteterre le Romain. Only the fingers on the top surface of the recorder are fully visible, but analysing their position tells us a lot about where our thumbs should be as well.
Look at the shape of the fingers and their position, relative to the recorder. They’re gently curved, adopting the shape they naturally take when at rest, and lie more or less at ninety degrees to the recorder. If you have one nearby, grab a recorder (I suggest a descant or treble) and try to emulate this finger position with your own hands. Now look down at your hands and see where your right thumb ends up.
If you follow this example to the letter, you may find your right thumb doesn’t even reach the back of the recorder - this is partially dependent on the relative lengths of your thumb and fingers, as well as the size of recorder you’re holding. If this is the case, gently move your thumb over until it finds a natural position on the back of the instrument. It’s a good idea to stand in front of a mirror while doing this, as it allows you to easily see the position of your fingers too. Don’t forget to hold the recorder up to your lips so you can really gauge your natural playing position.
What’s the perfect position for your right thumb?
This varies from person to person, depending on their hand size - after all, we’re all built slightly differently. In general though, the best position is somewhere between the 4th and 5th finger holes. I’ll come back to this later, when we consider how to achieve a consistency of thumb placement.
Hand shape can have a big impact
As you hold your recorder up to play, look down at the shape of your hand. How much space is there between your thumb and first finger? Are they close together, or is there some room between them? Ideally you’re after a rounded space beneath your fingers - imagine being able to pop a small satsuma or tangerine in the palm of your right hand!
A good hand position
Now look at the position of your right wrist. Try to avoid dropping your wrist towards your body. Doing so reduces the space between thumb and fingers, creating tension across your knuckles. Tension is never a good thing! Aim for a natural, gentle, convex curve in your wrists which is a continuation of the shape of your fingers. If you’re not sure whether you’ve found the right position, try intentionally dropping your wrist and see how it feels. You’ll immediately notice it’s harder to cover the finger holes and your knuckles will feel more tense and restricted.
When the right wrist drops it negatively impacts the position of the fingers too
How bendy are you?
We all naturally have differing levels of flexibility in our bodies. Having a good range of movement in our joints is generally a positive thing, but for those who are very bendy, or even have hypermobility, it can create difficulties. Hold your right hand in front of you, as in the picture below, as though giving someone a ‘thumbs up’. How far does the tip of your thumb curve back on itself? For most people it will bend a little, but for those who are double jointed or hypermobile it can comfortably stretch almost as far as ninety degrees - this is sometimes known as a ‘hitchhikers' thumb’, as you can see below.
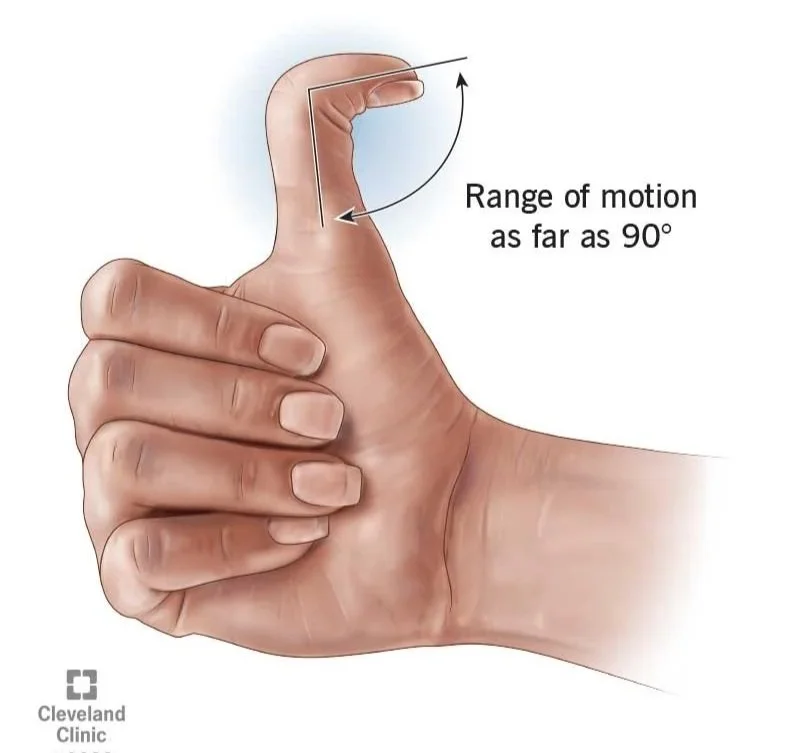
Image from www.clevelandclinic.org
For recorder playing this can result in a less than ideal position for either hand. For the right hand, it can reduce the space between thumb and fingers when holding a recorder, resulting in tension across the knuckles as I’ve described above. If you recognise this description in your own hands, try bending the top joint of your thumb a little to open up this space, rather than just allowing it to flop into its totally relaxed, overextended position. This may help, if you can get used to a change of position, but I have another solution which I’ll talk about below.
Make gravity your friend
Its not uncommon to feel the recorder is in danger of slipping though your hands when playing. If this occurs, players sometimes end up resting one of their fingers between the holes (often the right hand first finger) for extra support and control. This is far from ideal, as those fingers should really be concerned merely with covering the holes!
If this description seems familiar, try lifting your recorder up a touch more, moving it slightly closer towards a horizontal position than a vertical one. Doing so changes the instrument’s centre of balance, allowing gravity to gently push its weight down onto your right thumb. Even a small change here can have a big effect, making it feel that the recorder is less likely to slip from your hands.
Compromise is sometimes necessary
Just as the length of your thumb can affect how close you get to the ‘perfect’ hand position, the size of recorder you’re playing also has an impact.
For most people, smaller recorders, such as descant and treble, can be played with little difficulty, but when it comes to the larger instruments compromises sometimes need to be made in order to cover the finger holes. It’s not unusual to have to drop the right wrist a little in order to play the tenor recorder, simply because the distance between the finger holes is greater. However, when we reach the bass, this stretch required is often diminished again because of the addition of keys to cover certain holes.
To play my straight tenor recorder I have to drop my right wrist a little, but I have fairly long fingers so I can still cover the fingerholes without difficulty.
The Knick - a practical trade off
In recent decades Knick instruments have become much more commonplace - especially tenor and bass recorders. The bend in the head joint brings the body of the recorder closer to your own body, reducing the strain on the arms and making it easier to reach the finger holes. In general this is a positive thing, but there’s a trade off as it also change the instrument’s centre of gravity. I’ll talk about instrument supports in a moment - for knick instruments they’re particularly critical.
Having the knick shifts this middle joint into a more vertical position. This can make it feel as though the instrument is going to slide down through your hands - after all, the very nature of gravity pulls things downwards. I would argue that all knick instruments (be it a tenor or bass) really need a thumb rest. Many have one installed when purchased, but if yours doesn’t I would have one fitted as soon as possible.
New innovations
In recent years Kunath recorders, who make the square Paetzold instruments, have been innovating, allowing those with small hands to try sizes of recorder which might otherwise have been impossible to play. At the more expensive end of the scale there’s the Paetzold knick tenor, which has keys to cover all the finger holes. The end of the recorder rests on the seat between one’s legs, taking away all worries about supporting the instrument.
More recently, they’ve come up with a more modestly priced solution - the Sigo tenor. This has a folded internal bore (following the principle of the renaissance rackett), resulting in a tenor where the stretch between holes for the fingers is somewhere between that of a descant and treble. I know many players for whom this has been a real game changer, allowing them to play the tenor comfortably for the first time. A bass Sigo is also in the works, so it’ll be interesting to see if that is similarly impactful.
With both the Sigo and the Paetzold knick tenor, the right hand thumb position becomes much less critical as your seat provides all the support, allowing you to focus entirely on the fingers. Their tone and response may not be to everyone’s taste, but it’s been wonderful to see so many people exploring the mellow tones of the tenor without the discomfort faced by those with small hands.
Does your thumb need some help?
On larger recorders it’s not unusual for a thumb rest to be added to help you support the instrument, but don’t dismiss the idea of some assistance on smaller recorders if you need it. If a thumb support of some type makes it more comfortable and easier to play, there’s absolutely no reason why you shouldn’t use one.
Let’s look at the possibilities for recorder supports…
Traditional thumb rests
This is perhaps the most obvious way to help support your recorder, and they come in many different forms. Some instruments (basses for instance) come with a thumb rest pre-installed, and these sometimes include a screw mechanism to allow for adjustment. As we’ve already noted, hands come in many different sizes and in varying proportions, so one size doesn’t necessarily fit all.
For smaller recorders, thumb rests come in many different styles and materials. If you’ve never used a thumb rest and want to see if it’s the answer for you, the simplest solution can be a piece of BluTack or Plasticine before committing yourself to something more permanent. You only need a small piece, and it can be shaped and re-shaped to suit your needs. I would start by placing it on the back of the recorder, somewhere between the holes 4 and 5. If this allows you to comfortably cover the holes that’s great. If not, try moving it up or down a little until you find the perfect spot.
If this solution works, you might wish to go for something a little more aesthetically pleasing and/or permanent. A great, cost effective solution is a clip on plastic thumb rest, like those for descant, treble and tenor, made by recorder manufacturer Aulos. They only cost a couple of pounds and can be easily slid on and off the recorder. They blend in perfectly with plastic recorders, but take care when attaching them to wooden instruments to avoid scratching the surface of the wood.
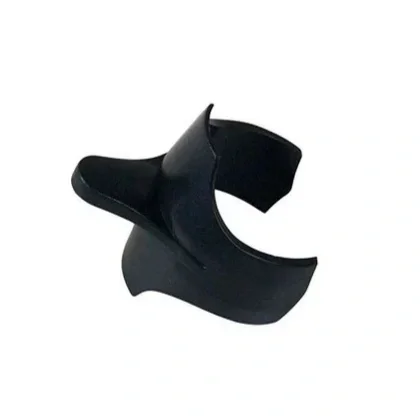
Photo from Early Music Shop
I’ve also seen recorder players who fashion a personalised thumb rest from modelling clay, such as Sugru. This solution gives you the chance to mould it to the perfect shape before it cures permanently. Sugru will attach to wood if you put it in place before the material has cured, but be aware that it may leave a mark if you later remove it. But there’s nothing to stop you moulding a thumb rest from this material and then attach it with double sided adhesive tape or a suitable type of glue once it’s set into its final shape. Sugru comes in many different colours, so this solution may allow you to find a shade which closely matches the wood of your recorder.
If you want a more permanent solution, you can buy wooden or metal thumb rests which can be glued or even screwed to the instrument. If you consider attaching one permanently, I would recommend consulting an experienced woodwind repairer for advice on the best type of attachment to use, lest you do irreparable damage to your favourite instrument!
Where to place your thumb rest
The most efficient and comfortable position for a thumb rest will vary, depending on the relative length of your thumb and fingers. For most people though, a good starting point is around halfway between the fourth and fifth finger holes. I would begin by experimenting with a temporary rest, shifting it up and down a small amount until you find the right spot for you. Bear in mind that the perfect position may vary between the different sizes of recorder.
Each time you move your temporary thumb rest, really take some time to explore how each change of position feels. Does moving it up or down a little help you cover the finger holes more easily? Moving it too low down can create unnecessary tension in the bottom joint of your thumb, as well as restricting the movement of your fingers, so take your time and really analyse what feels most comfortable.
Thumb rests for the terminally indecisive
Most people find a single position for their thumb rest which allows them to support the instrument and cover the finger holes effectively. However, it can take a little while to find the perfect spot. For those who can’t quite make up their mind I have a few practical solutions…
I’ve already mentioned the possibilities if Blutak/plasticene above, but another option is a short length of ribbon or cord. Many recorders have decorative mouldings on the foot joint and you can anchor the ribbon around these. You then create a loop of ribbon, into which you tuck your right thumb. It can be a little fiddly to install, but once you’ve got the length right it’s a lightweight and flexible way of supporting your instrument without having to glue anything in place.
A friend of mine recently shared a different solution she’s alighted upon. Attaching a small piece of fine grade sandpaper to the back of your recorder using double-sided adhesive tape, with the rough side facing your thumb, it creates a small amount of friction to help hold the instrument against the skin. This solution doesn’t provide any active support, but can offer a little more reassurance than the natural shiny surface of a recorder. When the sandpaper loses its roughness it can easily be replaced with a fresh piece. Incidentally, the curved corners to the sandpaper in the image below make it less prone to peeling away. As you can see here, my friend Rose combines this with a home made thumb rest made of Sugru, creating a positive sense of security when playing.
Is it okay to use a thumb rest on smaller recorders?
Absolutely, it is!
I’ve met players over the years who don’t use a thumb rest as a matter of pride - somehow they feel using one would be tantamount to admitting they’re less of a player. I disagree with this and take a pragmatic approach. If a thumb rest makes playing more comfortable and allows you to cover the finger holes with ease, you are within your rights to do so on any size of recorder.
When I taught the recorder to young children I would habitually provide them with a clip on thumb rest (like the Aulos one pictured above), even on a descant recorder, and especially if they had small hands. Doing so meant they consistently put their right thumb in the correct position from the start and allowed them to have a good sense of stability and control as they played. With a thumb rest in place from day one, it also meant they were less likely to get into the bad habit of resting their fingers on the instrument between the finger holes. As we all know from painful experience, it’s always better to create good habits from the start than to have to unlearn bad habits later. As my pupils grew they sometimes removed the thumb rest later, but by that stage they had good habits in place and were able to hold the recorder with confidence.
Yes, I realise that most of my Score Lines readers won’t be children, but there’s absolutely no reason why you shouldn’t use a thumb rest if it helps you at any age!
Other methods of support
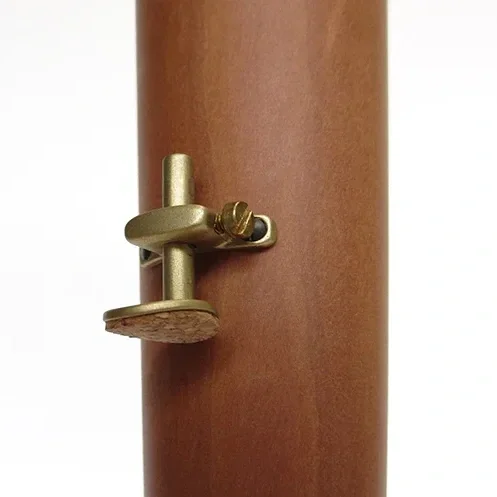
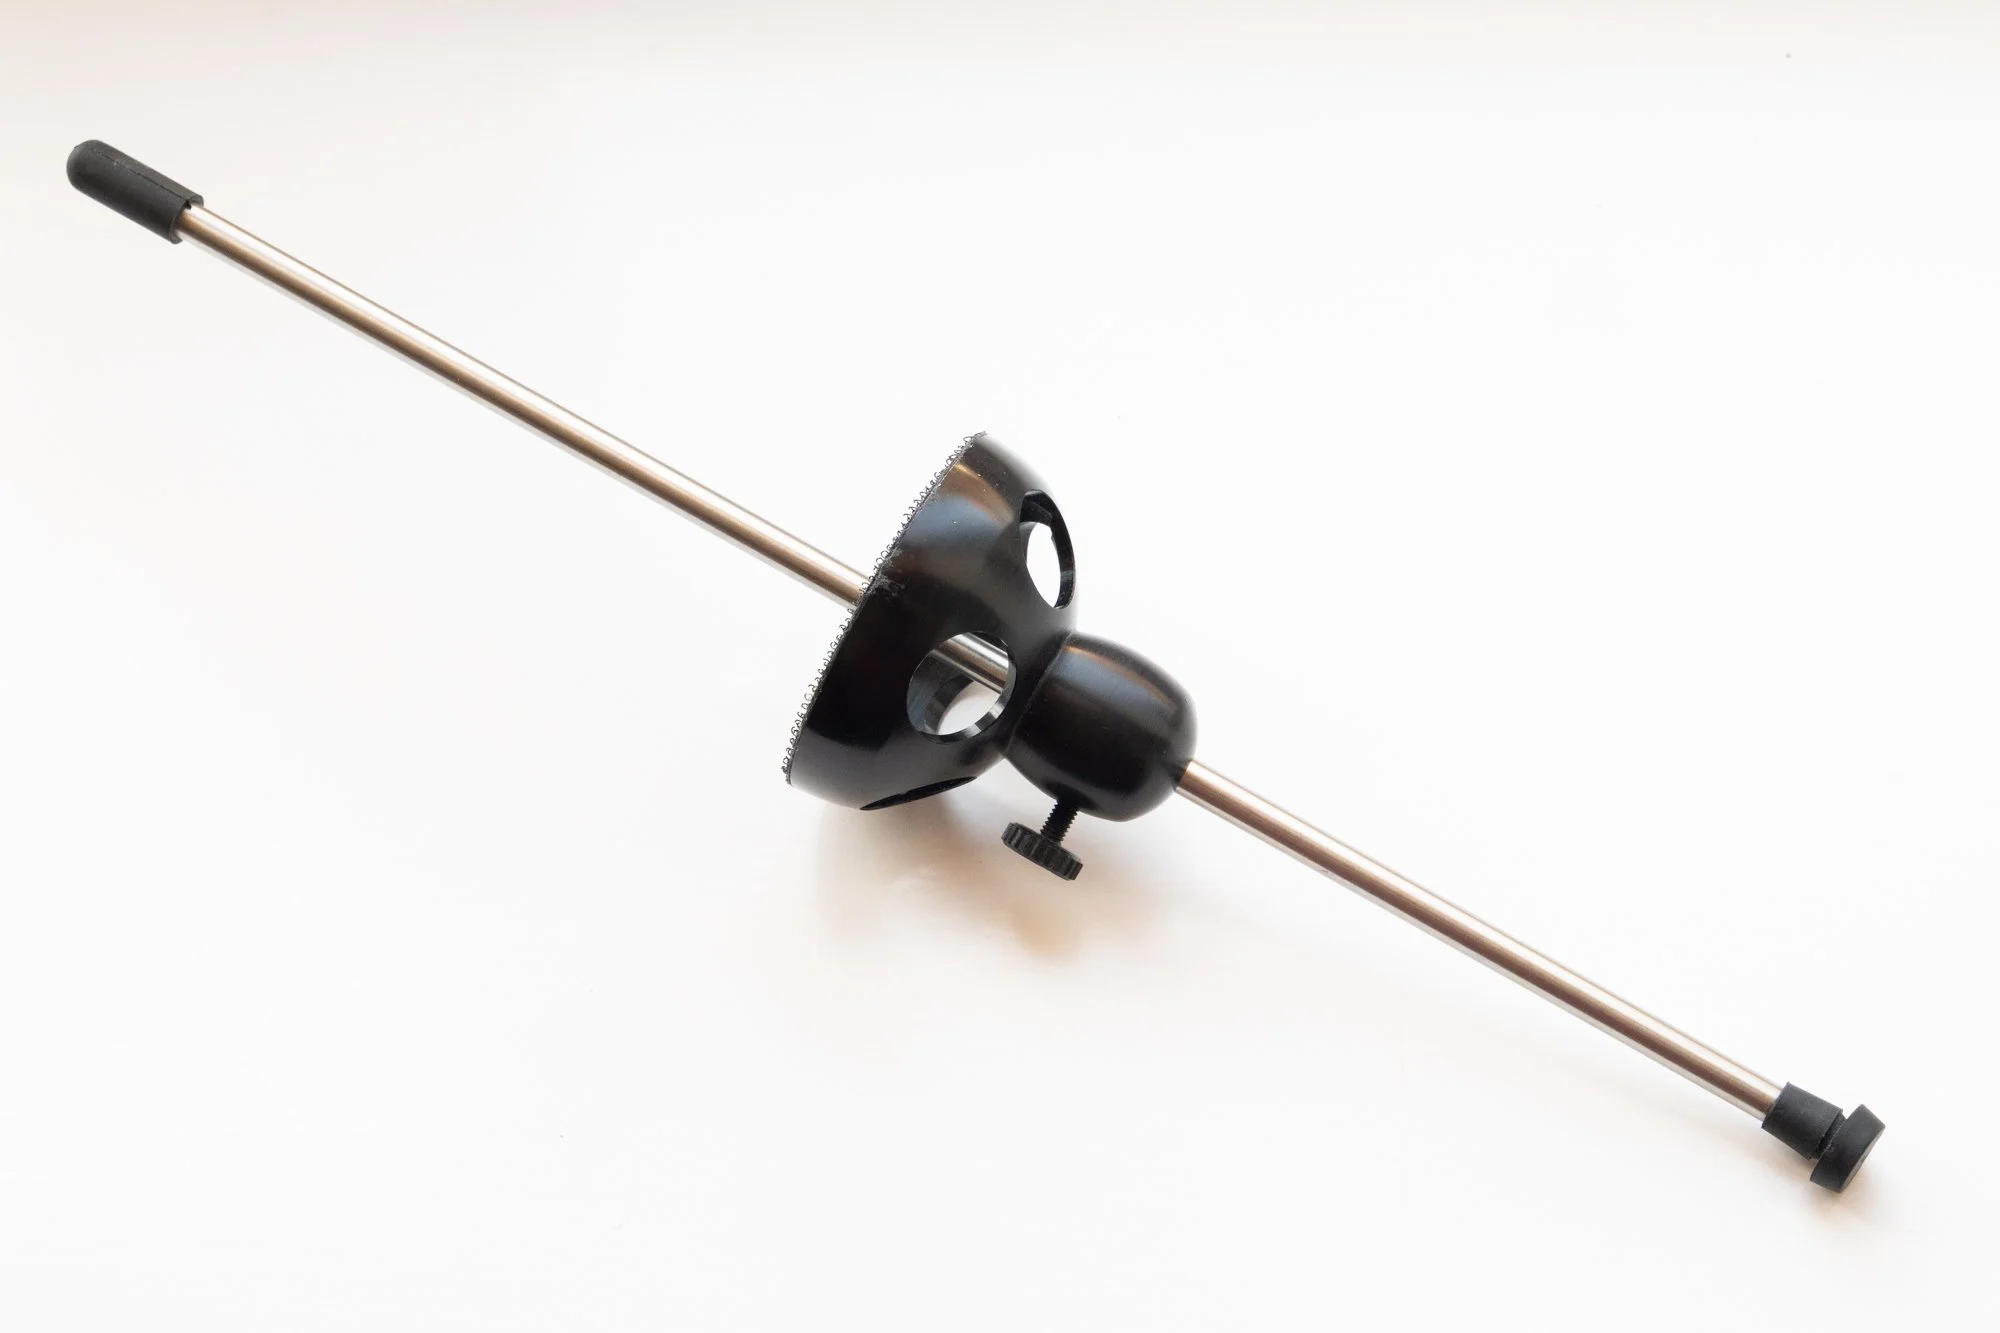
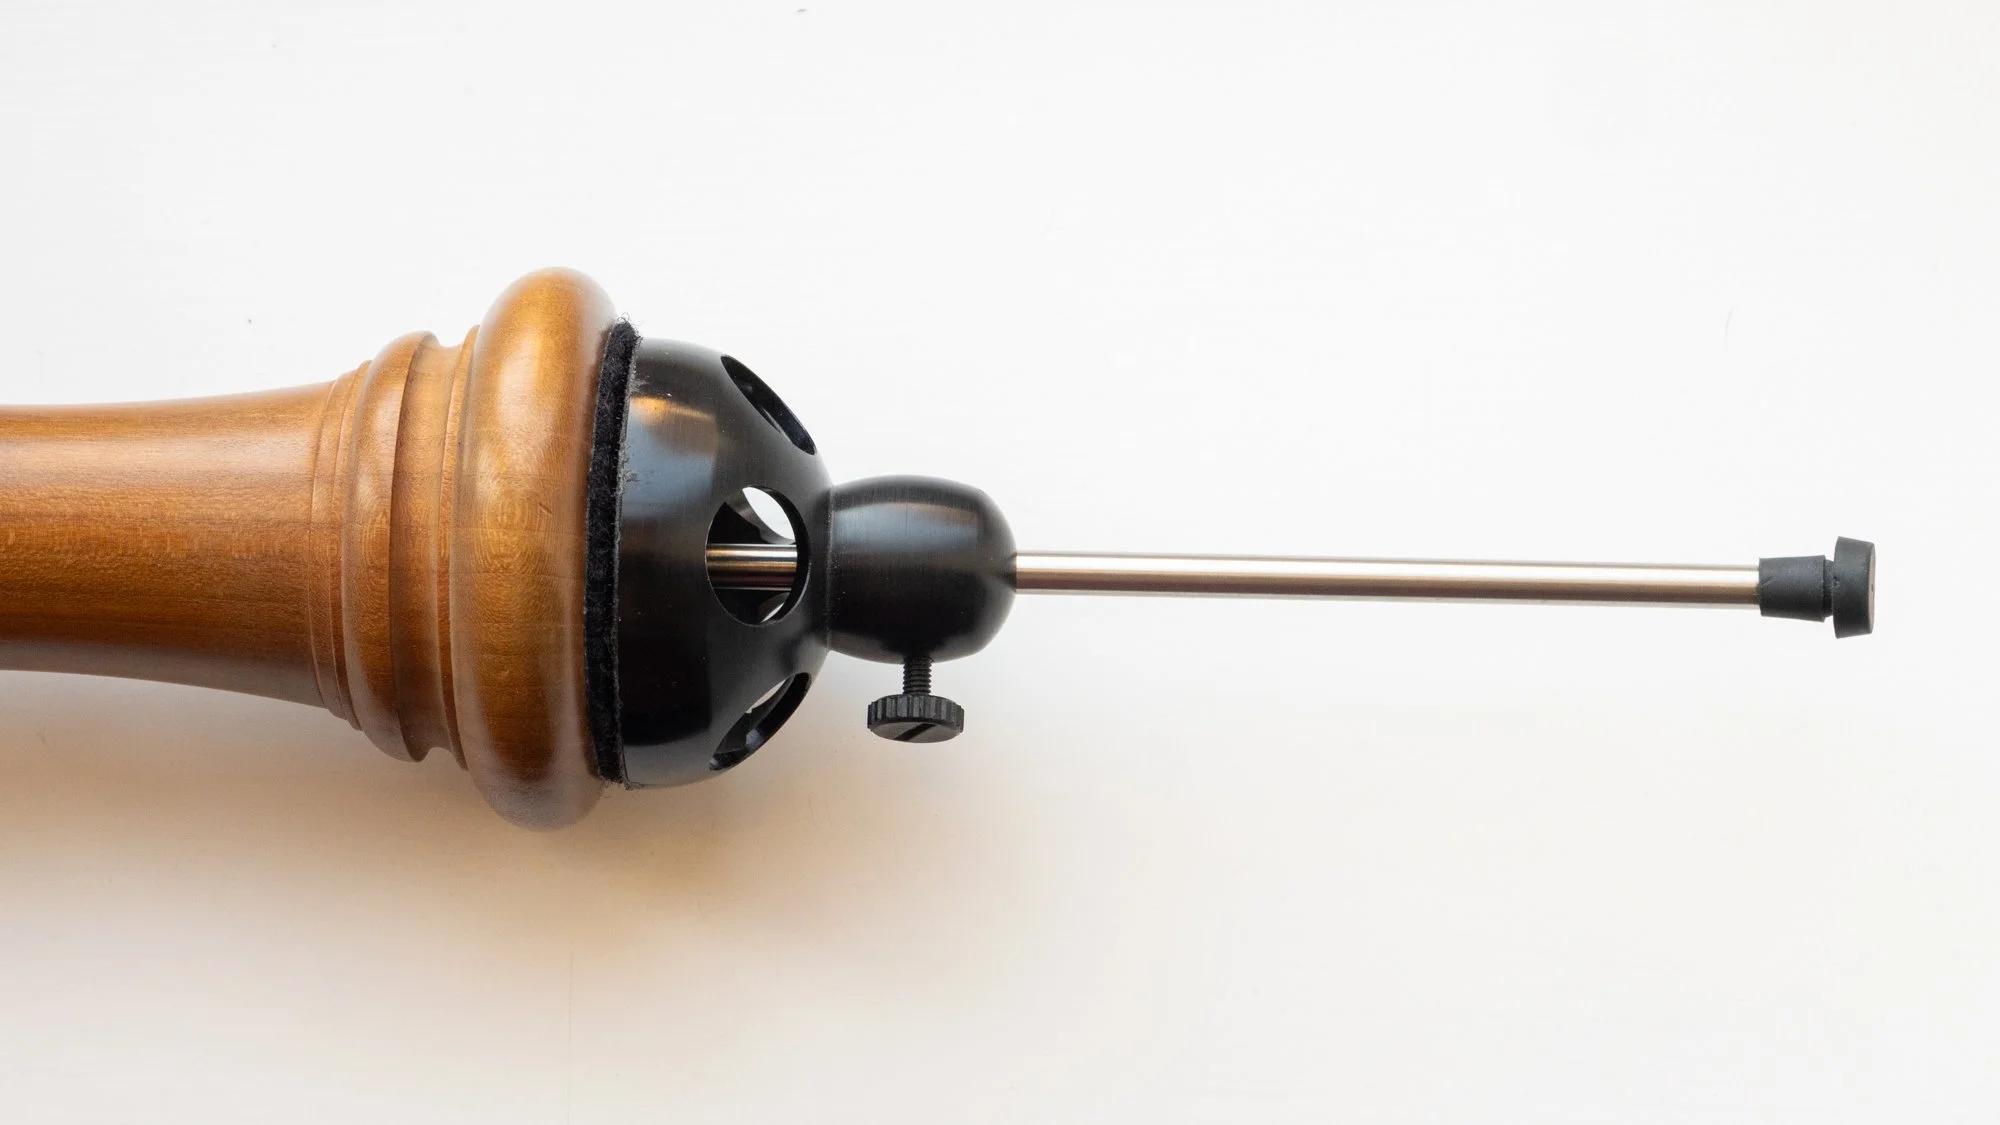
Larger recorders, such a tenors and basses may require more support than just a thumb rest, to compensate for their additional weight. Most bass recorders come with a sling (which can be worn around the neck or across the body), but there’s another possible solution - a spike. This attaches to the bottom of the instrument, transferring all the weight into the ground. Some bass recorders are now supplied from the maker with a screw-in spike (the Kung Superio bass comes to mind), but detachable ones (attached with a ring of Velcro) are available for any variety of bass recorder. I have an aluminium one, made by Anthony Barrett (pictured below), but wooden ones are also available.
The buttress finger
I’ve already mentioned the dangers of resting the right hand first finger against the recorder for additional support. This particular finger is needed for many notes and doing this can really slow down your playing. However, the concept of using a ‘buttress finger’ is a technique many players use. Compared to the other right hand fingers, the little finger spends much more time in the air and is only occasionally required to cover a finger hole. This means it can be used as an additional point of support. By resting it on the decorative beading at the top of the footjoint, it works in tandem with the right thumb to create a greater sense of balance and security.
I sometimes do this myself, although there are certain pieces of music (I first discovered this while learning the Vivaldi Concerto in C minor) where it’s less convenient as I need the little finger more often than usual to shade the lowest hole to tune certain notes. This may not be a problem in the repertoire you play though, so I would definitely give it a try and see if it helps you.
Challenges for the ‘mature’ recorder player
As I’ve already mentioned, achieving the ideal hand position can be tricky for those with overly bendy hands. But similar issues can often afflict all of us as we age. Getting older brings many benefits - greater knowledge, experience, confidence - but sadly for many it can also bring arthritis and decreased flexibility. When this strikes the hands it can result in deformed joints, sometimes making it harder to cover the finger holes cleanly.
If this problem makes it difficult to cover the lowest holes, one solution is to buy a recorder with keys, or to have additional keys installed on existing instruments. But if arthritis affects the bottom joint of your right thumb this doesn’t necessarily solve the problem entirely. Many years ago one of my adult pupils encountered exactly this problem and her solution was to create a built up thumb rest from layers of cork. Moving the right thumb away from the recorder opened up the space within the palm of the hand, allowing her to reach the fingerholes more comfortably. Ultimately she commissioned someone to make a wooden thumb rest of the right height for each of her recorders, which served the same purpose and looked very elegant.
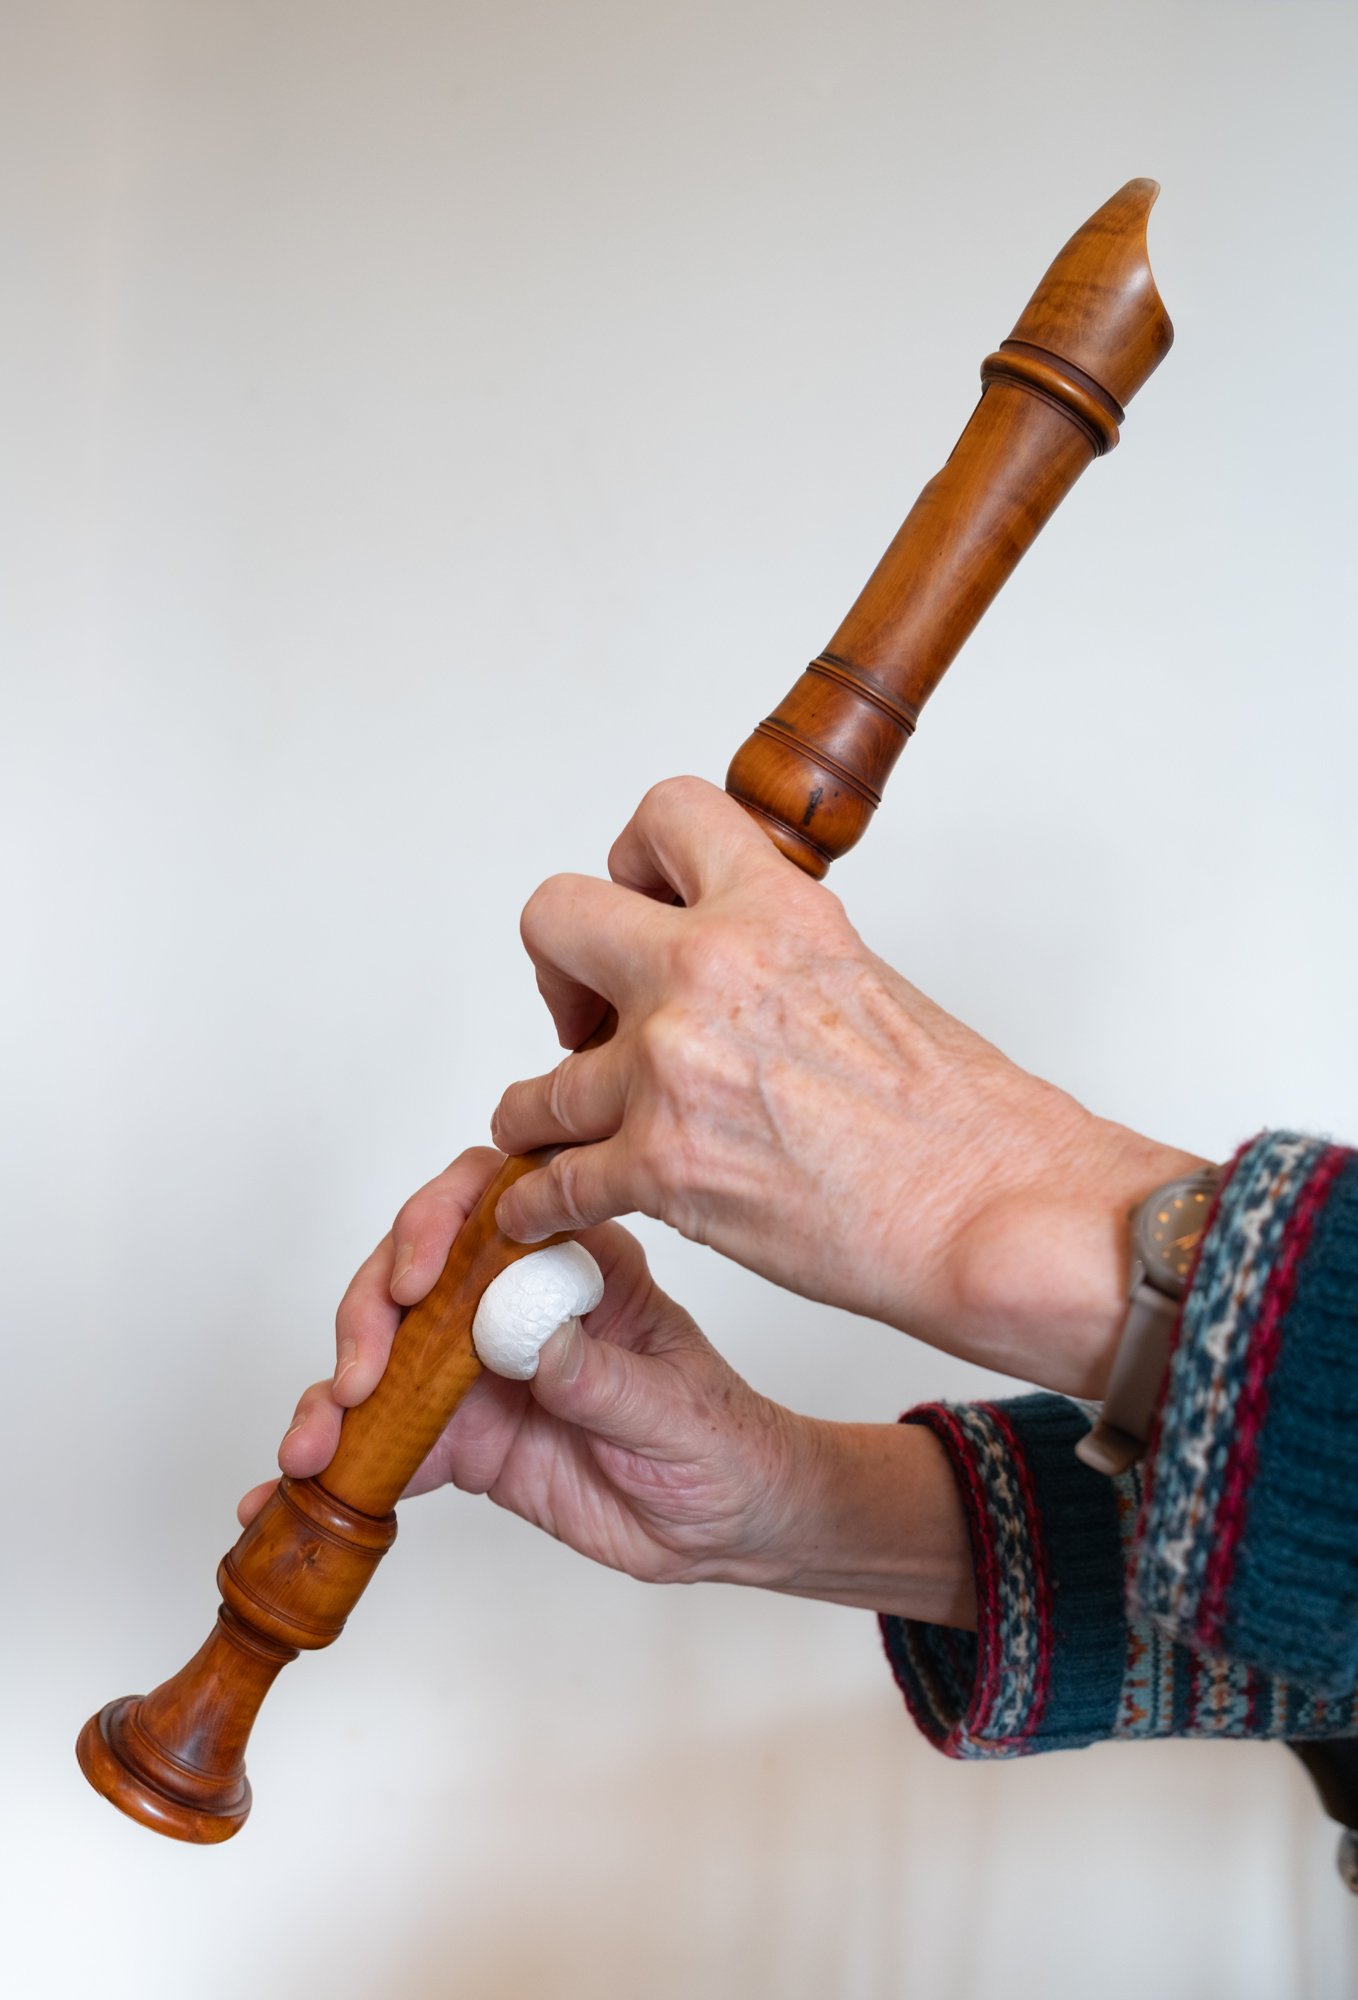
More recently, another friend of mine has faced the same problem and has come up with an equally ingenious solution. A simple polystyrene ball, purchased from a craft shop, can be easily carved out to fit onto the back of the recorder, with a small scoop excavated from the opposite side for the thumb to rest beneath. Once shaped to the right proportions it can be attached with double sided tape or even an elastic band.
If arthritis means you’re struggling to reach the lowest finger holes, I suggest you explore this solution. These balls can be bought inexpensively, in many different sizes, and with a little trial and error you’ll find the perfect size to give your right thumb the appropriate degree of ‘lift’. For my friend, this has enabled her to keep playing the recorder as the arthritis in her thumb has progressed and she’s now created appropriately sized rests for all her recorders.
Many thanks to Jan for allowing me to take and share some photos of her thumb rests (and hands) - I’m sure these explain the concept better than my words could ever do! If this is a problem you’re facing I hope it may inspire you to explore this option and hopefully keep playing for many more years.

How’s your right thumb doing?
Have my words made you look at this neglected digit in a new light? Have you spotted something in your own hand position which would benefit from some care and attention? None of this is rocket science, but sometimes a small adjustment can make a real difference to our playing. I’d love to hear if this helped you and perhaps triggered you to make some changes to your technique. A big thank you to Richard, my Score Lines subscriber, whose email inspired this blog post - your words made me think in a new light about my right thumb! As ever, please do leave a comment below if you have questions or feedback - who knows your comment could start my train of thought towards the next Score Lines blog!