Hints and Tips

Learning to become a musical butterfly

The human brain is a marvellous creation - capable of amazing feats of mental gymnastics. Yet there are moments when somehow our brains spontaneously go off piste, taking us on a completely unintended path. Why is this, and what can we do about it?

In particular I’m thinking today about the challenges of playing different sizes of recorder. As recorder players we’re required to become the musical butterflies, flitting from one size of instrument to the next, with a mix of different fingerings and clefs. I’m willing to bet, like me, you’ve had moments where it all goes wrong and you randomly switch into the wrong fingering, for no apparent reason. Am I right? This is a problem recorder players often fret about, but in my experience, it’s completely normal.

I’ve been teaching for over 30 years and in that time I’ve only encountered one pupil who never experienced this. That child, around the age of 9, began exploring treble fingering after playing the descant for a year or two and, as far as I can recall, never suffered any confusion between the two sets of fingerings. Rest assured, she’s a complete outlier - an exception to the norm. You’d think, as a professional recorder player, I’d be immune to such confusion, wouldn’t you? Oh no, I’ve even been known to occasionally slip into both the wrong fingering and the wrong clef at the same time - double the catastrophe!

Why does this happen? The fundamental problem is the fact that the recorder family commonly uses two distinct sets of fingerings - C and F. This means when you’re playing the descant or tenor, the bottom note (all fingerholes covered) is C, while on the treble and bass the same fingering will elicit an F. We take this for granted, but there could, arguably, have been a better way.

Take the brass family for instance. Every brass instrument with piston valves (trumpet, cornet, euphonium, tuba etc) uses one set of fingerings. If you have lips with sufficient flexibility you could switch from trumpet to tuba in a matter of moments, using precisely the same fingerings. In a brass band everyone even plays in the same clef - including the huge B flat basses. One could argue there was a moment, during the first years of the recorder’s revival in the early 20th century, when such a system could have been implemented for our instrument. I’m certainly not the only person to have considered this idea. Evidently some publishers toyed with the idea of taking this route as I have an old Peters edition of a Telemann Sonata which provides recorder parts in both C and F fingering. One can only assume this experiment wasn’t popular and they reverted to the familiar notation we have today.

Sadly this concept didn’t take off, so instead we give our brains extra exercise by learning multiple sets of fingerings. No doubt this flexibility is wonderful in terms of staving off dementia in later life, but it does create the potential for confusion!

Which fingerings should you start with?

For most of my readers this is somewhat academic as you probably already play both C and F instruments. But if you’re new to the recorder, which should you learn first? For children the answer is usually the descant, purely because the instrument’s size better suits small fingers. For adults though, there’s a strong argument for beginning with the treble. The lower tone is more pleasurable when you’re taking your first steps, and ultimately there’s a far wider range of repertoire for solo treble than descant.

Another good reason for beginning with the treble comes when you take your first steps into ensemble playing. More often than not the descant will play the top line, meaning every mistake feels horribly exposed. Playing the treble puts you in the middle of the ensemble - a much more forgiving spot when you’re finding your feet. Any errors will be better hidden and you can build your confidence more easily.

I can play one set of fingerings, why would I want to learn more?

If you’re at the stage where you’re still playing just one set of fingerings, the thought of learning a second set can be daunting. But it’s definitely worth the effort. Playing more than one size of recorder opens up a wider range of music to you and you’ll be welcomed more enthusiastically into ensembles. Yes, you can play descant and tenor without learning different fingerings, but if you’re to count yourself as a truly rounded recorder player you’d be wise to expand your horizons further.

How to get started with a new set of fingerings

If you want to move from C (descant/tenor) fingerings to F (treble) there are books out there which can help. Brian Bonsor’s tutor book, Enjoy the Recorder, comes in varieties for C or F fingerings, but there’s also a ‘From Descant to Treble’ edition. This begins by helping you over that initial bump, as you realise each familiar note now requires a different fingering. Yes, the book was written with children in mind, but it’s packed with lovely tunes and takes a tone which isn’t childish, so it’s just as good for adults to make this step.

If you wish to make the shift from F fingerings (treble) to C (descant/tenor) you’re not quite so well served with books. However, there’s no reason why you can’t learn the new fingerings on your own. The important thing to remember is you’re not actually learning new fingerings. The patterns you use on all sizes of recorder are fundamentally the same. If you play a scale on one recorder then play the same fingerings on a different size of instrument you’ll it’ll sound just as good - just at a different pitch.

So how to get started?

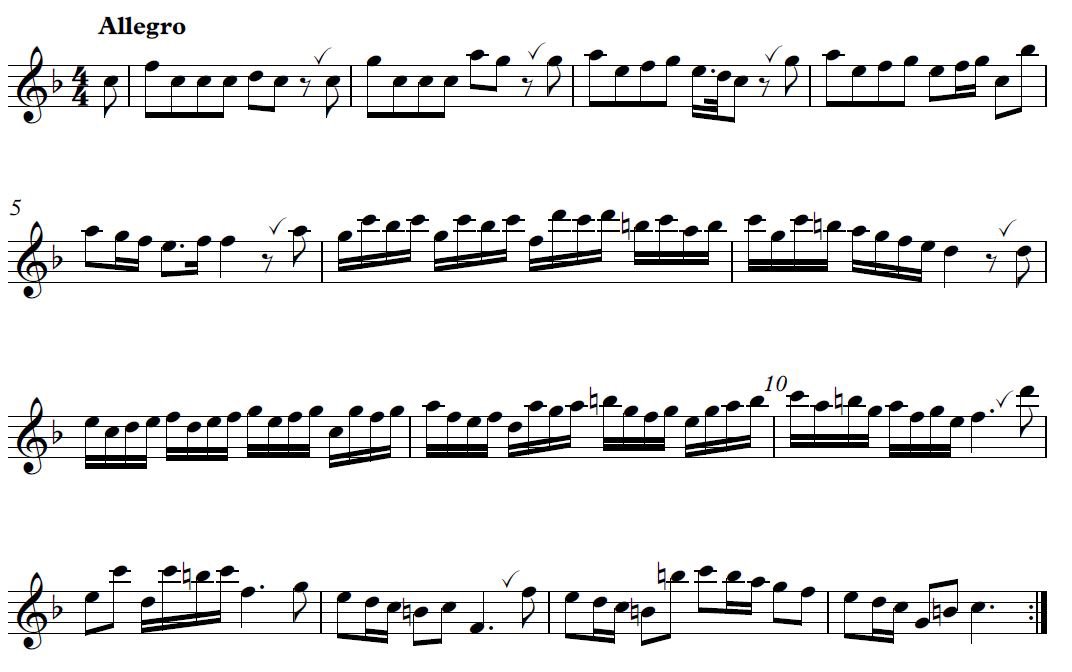
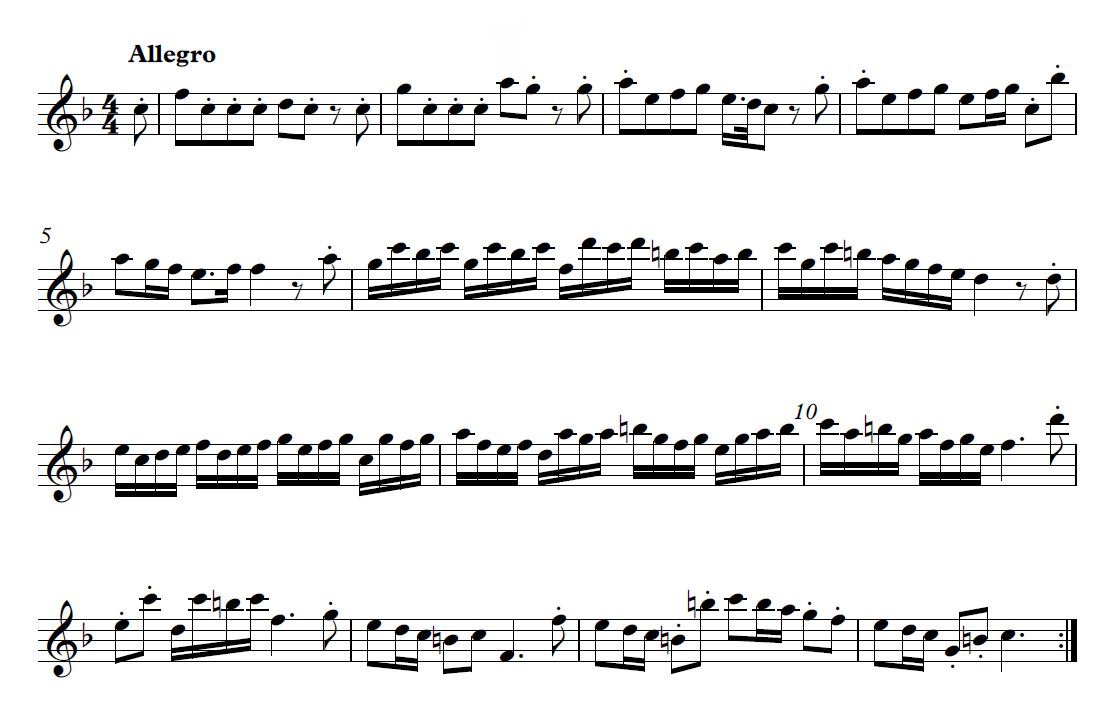
It’s a good idea to learn at least a handful of scale and arpeggios on the recorder you’re already familiar with. Nothing too complicated, but it’ll help if you can associate the combinations of finger patterns with the dots on the page. For instance, here’s a scale of F major for treble recorder. Below it I’ve added a descant/tenor recorder scale which uses the same fingerings - C major.

Play the one on the instrument you’re familiar with, then play its counterpart on the unfamiliar size of recorder. Let your fingers find their way, using the combinations of finger patterns you already know. That was simple enough, wasn’t it?

Play it again, this time consciously associating the notes on the page with the fingerings you’re using. This is easy because you’re used to running up and down scales in the music you already play. For most stepwise note movements you’ll lift a finger to go up and add a finger to go downwards - all very logical. A greater challenge comes when you need to play music which jumps around as you have to move more fingers.

Choose some anchor notes

Once you progress past simple stepwise movements it’s helpful to have what I call anchor notes. By this I mean a small selection of notes which you have firmly fixed in your mind and can locate quickly. For instance, the bottom note of your chosen recorder (all fingers covered) would be a sensible choice, as you’ll never need to play any lower than this. Then pick a handful of other notes, scattered through the recorder’s range. These would be my suggested anchor notes for treble and descant recorders:

With a confident knowledge of the fingerings required for these notes, you can then work between them. They give you fixed points on the recorder, between which you can navigate. I guess it’s the musical equivalent of sailors navigating with the help of the stars before the invention of a clock designed to help them track longitude. Faced with an unfamiliar melody line, you can use these to figure out where you start and as familiar landmarks along the way.

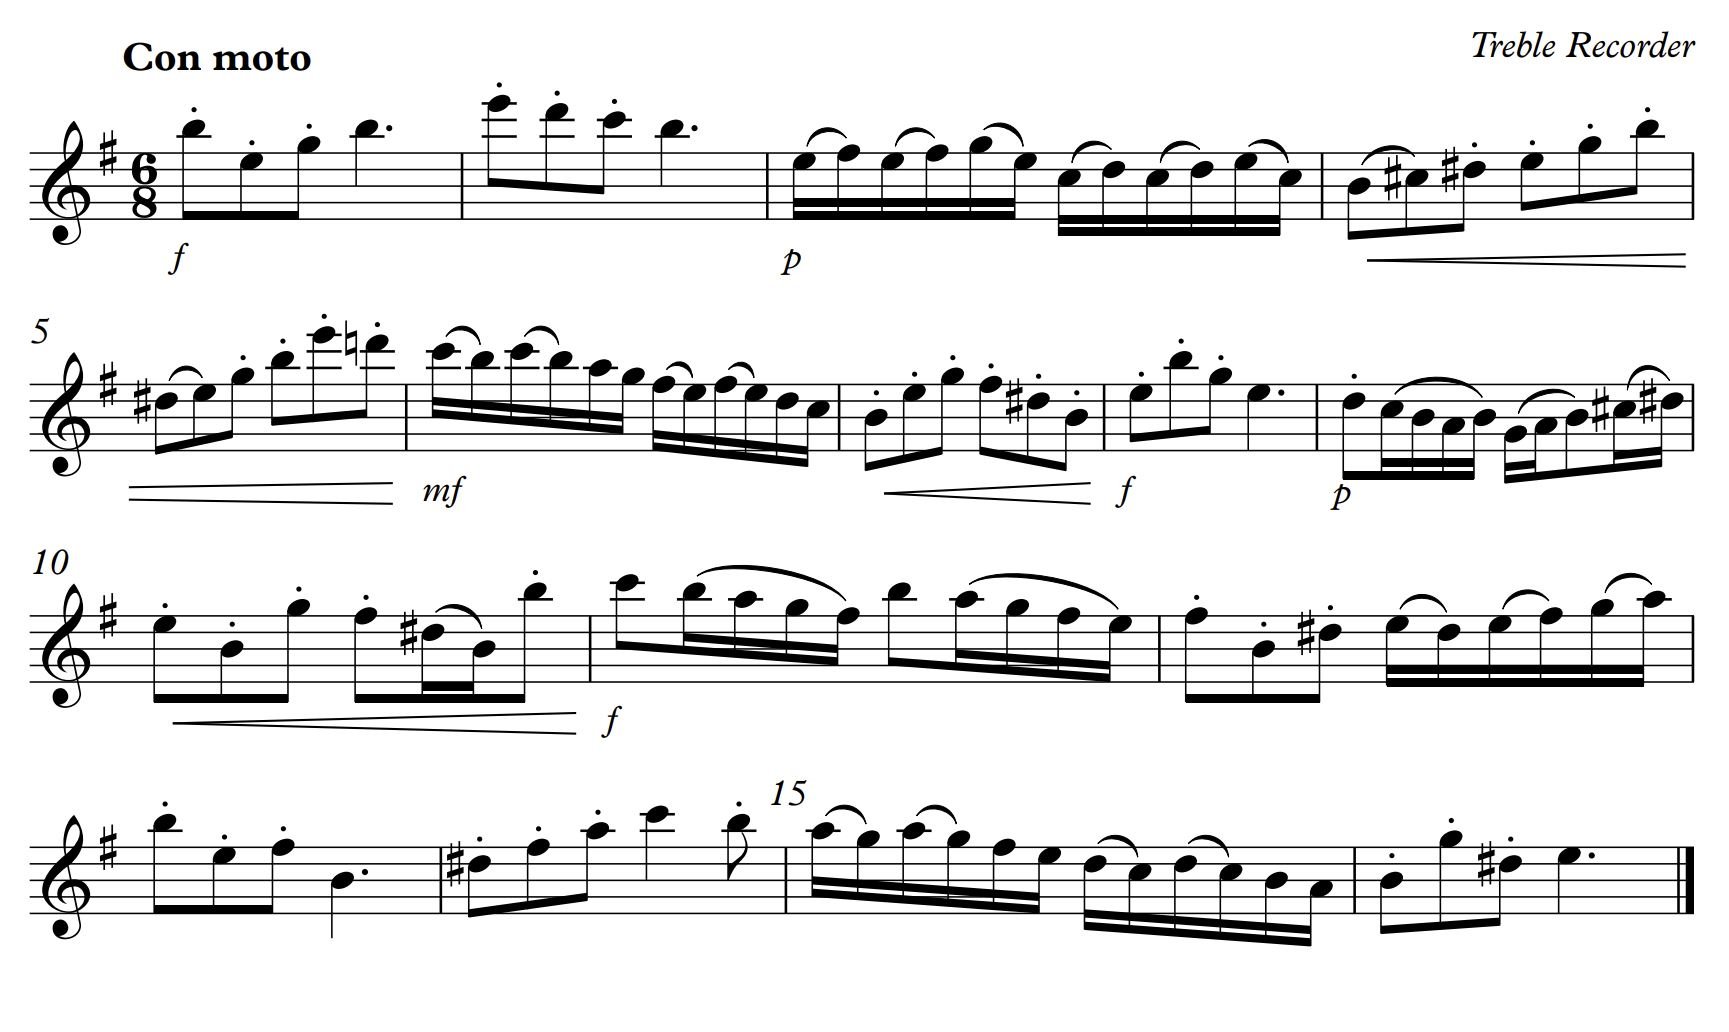
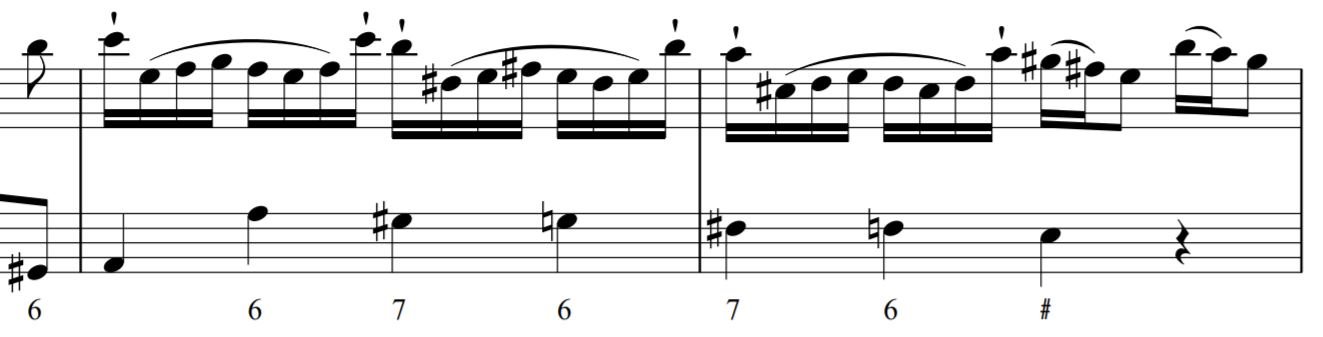
For instance, take this section from the melody, Daphne:

The first note is one step above one of our anchor notes, so we immediately know to cover one less finger hole. We then have some stepwise movement, where you can use the scale patterns you already know. The jump to high D takes us one step above another anchor note and then into another scale. These fixed points allow us to navigate our way through the melody accurately, and as you learn what the tune sounds like you’re able to judge whether you’re playing the right notes.

Start with simple material

Using this method you won’t be a particularly quick sight reader initially, so it’s really important to select simple material at first. If you jump straight in with a fast, complex piece you’re much more likely to be disheartened and give up.

Don’t look back!

It might be tempting to keep relating your ‘new’ fingerings back to the ones you’re familiar with. For instance thinking something along the lines of, “This is a G on my descant, so it’ll be a C on my treble”. Effectively you’re transposing everything on the spot. Yes, it might work for slow, simple material, but in the longer term it’ll slow you down because you’re forcing your brain through more processes to find each note. I had a pupil who did exactly this on the treble recorder when he first came to me for lessons. Somehow he’d reached grade 8 standard, but his treble sight reading was abysmal and painfully slow. Over time we worked to help him associate the dots on the page directly with the treble fingerings and his sight reading improved enormously. Yes, the process will be slower at first, but you’ll make quicker progress in the longer term.

Random forays into the wrong fingering

As I mentioned earlier, one of the most frustrating aspects of playing two sets of fingerings is that moment when it all goes wrong. It’s not unusual to randomly play a wrong fingering (for instance a descant fingering on treble or vice versa) for a note or two and then switch back again - sometimes without even realising it’s happened!

This may feel like a random act, but there are common trigger notes, so it’s rarely as random as you think. If you’re aware of these danger spots you’ll be better able to realise when it happens and, ultimately, to try and avoid these errors. These are the most common triggers I see:

  • Leaps in the music - As we’ve already seen, playing music which moves by step is pretty straightforward because we’re using familiar scale patterns. Leaps are more challenging when you first switch instruments and, as a result, these are the spots where random acts of fingering often happen. Try to be sensitive to this possibility when playing your least familiar size of recorder.

  • Notes which look like they belong to another instrument - This often applies to high notes. On the treble recorder it’s not uncommon for the music to fly up to two, three or even four leger lines above the stave. If you’re a confident treble player you know this, so when faced with a top C or D on the descant or tenor your brain can unconsciously slip into treble fingering. Equally, low treble notes might subconsciously take you back to the earliest notes you played on the descant or tenor and cause you to play the wrong fingering.

How to spot when you’ve gone off piste

The best way to spot errors in fingering is to listen. For instance, when playing in an ensemble with several players on each part, ask yourself if your notes match those of your neighbour. As Walter Bergmann was fond of saying, “If all the others are wrong and you alone are right, follow the wrong.” This will most often happen when sight reading, or towards the end of a rehearsal when you’re tired and are losing concentration.

Switching to other sizes of recorder

Once you’re fluent in both C and F fingerings you open up a whole world of other possibilities. For instance, the bass recorder uses the same F fingerings as the treble, albeit in bass clef. Playing the bass allows you the chance to be part of the musical foundations in an ensemble and can be very rewarding.

If you’ve ever played another bass clef instrument, adjusting to using your familiar fingerings in bass clef may not cause too many challenges. However, if the clef is totally new to you, I can recommend Mrs McGillivray’s Welcome - a book specifically designed to help you make this switch. It has some useful advice about first steps and is packed full of tunes which progressively expand your range on the bass. Using the same strategy I suggested for the descant/treble switch will work just as well for other bass clef instruments - including the great bass in C.

Venturing further off the beaten track

If you choose to explore more hard core forms of recorder playing, you may be faced with treble recorders in G, voice flutes in D or even more exotic creatures. All of these use the same set of fingerings as your humble descant or treble, but they revolve around a different pitch. For instance the bottom note (all holes covered) of a treble in G is, yes, you’ve guessed it, a G! The voice flute is a tenor recorder sized instrument, but the bottom note is a D instead of C.

For such instruments you could learn to read them as you did with the descant and treble. In practice though, many players (myself included) choose to use tricks to deal with these instruments, especially as they’re used less frequently. For instance, when I play the voice flute (from music in treble clef) I instead pretend the clef is actually a bass clef - as if I’m playing a small bass recorder - and the add three flats to the key signature in my mind. That gets me onto the right fingerings without too much in the way of mental gymnastics and only the accidentals require any adjustment.

There are of course occasions where this doesn’t work. I recently had cause to read a trio sonata with friends which was notated in French Violin Clef. That’s a treble clef which winds around the bottom line of the stave instead of the second line. Effectively, it’s very similar to the bass clef as the bottom line of the stave is G. My usual voice flute trick wouldn’t work because the music was effectively already in bass clef. I could have transposed the music, one note at a time, but my ultimate solution was to imagine I was reading from the alto clef and pretend I was playing a descant recorder! That made my head hurt a little, but it helped us get an idea of the piece was worth exploring further. Once I’d learnt he piece fluently it was no longer an issue.

If you choose to explore viol music you too may encounter C clefs - most likely alto or tenor clef. With these clefs, the centre point of the clef indicates the location of middle C. Often there are tricks you can use to tackle these clefs, much as I do with the voice flute. For instance, tenor clef music can be played on the tenor recorder by reading the dots as if they’re really descant recorder notes!

These examples will be outliers for many recorder players. It may be that you never venture beyond the standard sizes and clefs, and that’s absolutely fine. If you should choose to explore other recorders and clefs just be ready to think laterally to make reading easier.

Practising the switch

Let’s assume you’ve taken that first leap and begun to learn a different set of fingerings or a new clef - how do you practise these new skills?

The most important thing is to do it regularly! As with all new skills, if you don’t nurture them frequently you’ll lose them. This might take the form of practice at home, but don’t overlook ensemble opportunities. If you are a member of a Society of Recorder Players branch (or perhaps a chapter of the American Recorder Society if you live across the pond) take all your recorders with you and switch instruments between pieces of music. Playing with others will help you spot any errors and there’s the comfort of playing with others, many of whom will have been through exactly the same process too.

Switch up the order of your instruments. Don’t get into the habit of always practising your different recorders in the same order when you play at home. Sometimes, change things up - perhaps begin with the treble one day and then select the descant first the following day. This promotes mental flexibility and will develop your ability to play any recorder at will.

Do you have tips and tricks for switching instruments?

If you’ve been playing different sizes of recorder for a while, do you have techniques you find helpful? Maybe you’ve found a surefire way to avoid inadvertent switches, or perhaps you have a great way of reading alto clef? I’d love it if you would share your ideas in the comments below. You may have a method I haven’t considered and it’d be great if we could share our ideas.

Taking the stress out of sight reading

Do you relish first encounters with new music? Or does the thought of sight reading fill you with dread? Assimilating unseen music is an important skill for any musician, whether you’re taking your first steps or you’re an experienced player. The ability to play through fresh repertoire allows us to assess whether we wish to study it further, and in ensembles that fluency of reading is crucial if we’re to be a useful team player.

Think for a moment about what’s required of us when we’re sight reading. You’re reading a written language (much like reading text) and this tells us which notes to play and in what rhythm. Alongside this you have information about whether to play smoothly or detached, how loud or soft, tempo, character and more besides. When you consider the level of multitasking this requires it’s a miracle any of us can get from one end of a new piece to the other without falling over immediately! If sight reading is something you find difficult, don’t give yourself too hard a time - just remember how much you’re trying to do simultaneously.

Having made sight reading sound like an unscalable mountain, my aim today is to help you turn that mountain into a much smaller peak, or maybe a group of smaller hills. Sight reading may come more naturally for some people, but it’s a skill you can definitely improve with practice - just like any other aspect of musicianship.

Let’s take a look at what needs to happen when you’re given a piece to sight read…

One step at a time

It’s easy to panic when faced with a new piece of music but the best strategy is to break the task down into smaller chunks. Let’s consider the most important things to do before you play a single note….

Look at the key signature

Don’t just think to yourself, ‘There are two sharps”, but actually work out which ones they are - F sharp and C sharp. Finger these notes on your recorder so you immediately begin to build some muscle memory.

Check the time signature

How many beats are there in each bar and what sort of beats are they? The top number of the time signature tells you the number of beats, and the bottom number tells you the type. So 3/4 means three crotchet beats in each bar. If you’ve come to music in adulthood and missed out on learning the basics of music theory it’s worth seeking out some tuition to fill the gaps in your knowledge as this’ll help with sight reading too. A local music shop, if you have one near you, is a great place to ask about nearby teachers, and there are many online resources to help you learn about music theory. If this is something you’d like me to cover here, on the Score Lines blog do get in touch or leave a comment below.

Look for accidentals

Glance through the music and look for accidentals. Are there any ‘exotic’ ones which need translating - for instance a G flat is really only an F sharp in disguise. Recognising them in advance will help you play them with greater ease. While you’re at it, look for sharps and flats which repeat later in the bar - you could even pencil them in to remind you!

Check the tempo marking

What speed does the composer want you to play? You may not be able to play it at full speed immediately, but at least try to have any idea what might have been in his or her mind. Wikipedia has a great glossary of musical terms which is worth bookmarking for future reference.

Consider the tempo you’re going to play

You may have to play more slowly than the indicated speed at first, but you do need to have thought about it before you begin! Look through the rhythms to see how wide a range of note values you have. If the music begins with the fastest notes that’s handy, because you get an immediate feel for how whizzy the music will be. If the piece begins with slower notes you’ll need to think through the mathematical relationship between the note values so you understand their relative speeds. Pick a speed where you’ll be able to at least have a stab at the fastest notes, and don’t be afraid to subdivide the longer notes into smaller beats in your head if you need to.

Now look closer at the rhythms

Having taken a wide view of the piece, look a little closer. Look for any funky rhythms which don’t immediately look straightforward. Relate the rhythms to the beats and see if that helps you figure them out. Maybe tap or scat sing the rhythm to yourself initially so you’re not trying to cope with complex rhythms and the fingerings at once. You can also pencil beat numbers into the music if that helps you understand the rhythm more easily.

Check out the rest of the score

Finally, look through at the other markings in the music - articulation (slurs, staccato, accents), dynamics, ornamentation. You may not be able to put all of these in on the first reading, but knowing they’re there is a start. The most important thing is to get the rhythm and pitch first time out - if you can add further refinements that’s a bonus.


A practical example

Let’s put this into practice now and look at a real world example. This short piece comes from a book of practice sight reading pieces. It’s a grade 6 piece, but the processes we’ve just considered can be applied at any level. If you would prefer to try this piece for yourself on descant or tenor recorder you can find a transposed version here.

Click on the music to download printable version

So what jumps off the page at me when I first look at this music?

We have an F sharp in the key signature (E minor, but the name of the key is less important than knowing which sharps to play), with six quaver beats in each bar. The tempo marking, Con moto, means ‘with movement’ so I would probably try to feel two dotted crotchet beats per bar to achieve a sense of flow. If that makes the semiquavers too quick, there’s no reason why you couldn’t feel a quaver beat though.

Glancing through the bars, there are a few accidentals. Checking if any of them repeat during the bar, I see the D sharp needs to be played twice in bar 12. Looking at other details, there are slurs and staccato to be played. The articulation patterns are pretty consistent, with staccato on all of the quavers and most of the semiquavers slurred in twos. Finally, there are some dynamic markings. These tend to be further down my list of priorities as I feel it’s more important to get the notes, rhythms and articulation on a first read through. It all depends on how easily you can cope with everything else so don’t be afraid to prioritise the notes and rhythms if that means you can keep going without hesitating or stopping.

Coping strategies and survival skills

Like everything in life, sight reading is easier if you have some simple strategies in place to help you. If you work through the steps I’ve suggested above that’ll put you on the right path, but here are some handy tips to help you through…

Don’t stop!

I clearly recall my first experience of playing clarinet in the school wind band. We were playing Little Brown Jug by Glenn Miller and I’d only been learning about a year, so I was pretty unsure what to expect. My line was pretty easy, but still I made mistakes and I remember being confused when the band didn’t wait for me as I fumbled my way through! Sight reading an unaccompanied piece is a very forgiving experience - you can stop and start as often as you want. But, the moment when good sight reading skills really come in handy is in an ensemble setting, where the others simply don’t wait for you. Therefore it’s good practice to make yourself keep going at all costs, no matter what you’re sight reading. Drop notes on the floor, but keep the pulse going in your head - you can come back later for a post mortem on what went wrong.

Be methodical and get into a routine

Build good habits. Always working though a mental checklist of the details you need to check before sight reading a piece. If you do this methodically you’ll get into a routine and sight reading will become easier.

Look ahead

When we read words, we gain a sense of the meaning by reading ahead a little, taking in more than one word at a time. This allows us to understand whole sentences, rather than just single words. Music is just the same. Your progress when reading one note at a time will be very slow. Instead, try to look for groups of notes. For instance a dotted crotchet will often be paired with a quaver - think of this like a two syllable word. Beyond that, try to look further on so you see what’s ahead of you and can make sense of whole musical sentences. The faster the music moves, the further you’ll need to look ahead, but don’t forget these wise words from Winston Churchill!

“It is always wise to look ahead, but difficult to look further than you can see.”

Use the notation to help you

Music notation is designed to be helpful. Return to the music example above and look at the beaming. Beams are the horizontal lines which join together groups of shorter notes - quavers for instance. In most music, notes are beamed together in one beat groups. In this example the quavers and semiquavers are always connected together in dotted crotchet length chunks. This helps us see how the notes fit within the framework of the main beats in each bar. This helps you swiftly understand where the beats fall within the bar.

Be prepared for the notes you’ll inevitably forget

When faced with a key signature of multiple flats or sharps, there’ll always be one note you’re bound to forget - usually the last flat or sharp of the key signature. It must be something about the way our brains are wired, but almost every musician I know does this. If you’ve got three sharps, it’ll be the G sharp you’re likely to forget first, while in a key of four flats, you’re likely to overlook the D flats. If you know this you’re in a better position not to fall into the trap!

Focus on rhythm

Rhythm is what keeps music moving along so this should be your first point of focus when sight reading. Yes, aim to play the right notes too, but rhythm is key if you’re to get through the piece.

Don’t worry about perfection

A while ago I wrote a post about the tranny of perfection - the pressure we put on ourselves to be perfect musicians - a task we will always fail at. You can find it here, if you’d like to refresh your memory or read it for the first time. Sight reading will often cause us to fall into the same trap. It’s all too easy to feel you have to get everything perfect first time, but this a desire we’ll rarely fulfil. Instead, keep going, accept you’re going to make mistakes, but remember where they were so you can come back later to correct the errors.

Don’t be afraid to drop notes on the floor

I often jokingly tell ensembles they can drop notes on the floor and we’ll sweep them up later. Sometimes you just have to learn to edit the music on the spot in order to keep it flowing. I learnt this while studying for A level music. I was allocated a singer, whose lessons I was to accompany on the piano. Faced with a Vaughan Williams song with a key of five flats I knew I couldn’t play every note, so I focused on playing the bassline, along with some of the treble notes so my singer had enough accompaniment to carry him along. Second time round, I filled in some of the gaps, once I knew where the music was going.

Use your conductor

If you’re sight reading in an ensemble with a conductor, use them to help you get back on track. You probably won’t have time to eyeball them continuously. But if you’re able to keep their beat in your peripheral vision, you can then check that the first beat of your bars coincides with their downbeats.

Plan ahead and annotate your music

If you’re in an ensemble and you’re given your music while others are still being handed out, use that extra time wisely. Use the steps I listed earlier to prepare and don’t be afraid to pencil helpful notes in your music. Maybe glance through for accidentals and write in ones which reoccur so you don’t forget them first time.

Don’t panic!

Try to keep a clear head, concentrate solely on the task in hand and remember that nothing disastrous will happen if you do make a mistake.

Don’t forget to breathe!

While you’re focusing on getting round the notes, don’t forget to inhale from time to time. You need air to produce a good tone and the oxygen will help your brain to work better too.

You’ve got the basics, now to improve your skills…

Regardless of whether you’re a natural at sight reading, there are lots of things you can do to improve. Here are some practical things that’ll help you hone your skills.

Sight read often

Doing anything regularly will help you improve - conversely, if you only sight read occasionally it’s easy to forget the skills needed. Rummage through your own books of music for pieces you’ve never tried and set yourself the challenge of reading a few unfamiliar lines of music every day. There are graded sight reading books you can buy too and I’ve got some useful resources to share with you too. If you’re just starting out, something simple like a hymn book or a volume of easy folk songs will be useful. Think of this as musical speed dating. You have a short period with each piece of music, where you try to learn as much as possible about it, before moving on to your next date!

Be realistic about the music you choose

Don’t be tempted to select sight reading repertoire which is way beyond your capabilities. If you plan to work on a piece for several weeks or months it doesn’t matter if some of it is initially beyond you. Over time you’ll overcome the technical challenges and learn to play it. To hone your sight reading skills it’s better to choose something a little simpler so you have a sporting chance of maintaining a sense of flow. Over time you’ll be able to move on to more difficult music and stretch yourself further. This is where graded sight reading pieces can be useful, as you’ll be able to see the gradual progression in difficulty.

Practise scales and arpeggios

All music is made up from the patterns we find in scales and arpeggios. By learning to play these fluently, it helps us to recognise them when we see them in music. For grade exams you must memorise them, but I would argue that learning them from music is just as helpful for the purposes of sight reading. In the same way, there are certain combinations of letters which appear frequently in words - once we know this it becomes easier to understand and say words which use them - think of the ‘ough’ in rough, enough, thought and other words. Score Lines subscribers are welcome to download my scale and arpeggio sheets from the Members’ Area on my website. If you’re not a subscriber, why not sign up here for access to lots of exclusive subscriber goodies?

Explore different styles of music

Make yourself sight read music from different genres to widen your experience and learn to cope with unfamiliar patterns. One group I often conduct are great at sight reading early music, but really struggle with jazz based rhythms, purely because they’re less familiar with the style. The more you stretch yourself, the more adaptable you’ll become. Modern music often incorporates more complex rhythms than repertoire from the Renaissance or Baroque, stretching your rhythmic muscles more effectively.

Sight read with others

Playing on your own is enjoyable, but working with others makes you more accountable. Meet up with a friend to play duets, or find an ensemble you can join, where you’ll have to learn to keep going, come what may, when sight reading. If you don’t live near other recorder players, you can always play along with any of my Consort Videos to ensure you keep going!

Sight read on different recorders

If you play several sizes of recorder, make yourself sight read on all of them, perhaps picking a different instrument each day. Otherwise, if you always practise sight reading on the treble, there’s a danger you’ll be a demon reader on that recorder, but may struggle when faced with new music in descant fingering! If you struggle to find sight reading material for some sizes of recorder you’re very welcome to raid the my downloads page for more material.

Use your second chances wisely

When you play a piece for the second time, use that as an opportunity to get more detail and expression into your performance. Maybe pop in more of the dynamics or trills second time round. Be careful not to fall into the trap of overconfidence. On a second reading, subconsciously your brain is saying, “I know this piece a bit now - it’ll be easier this time”, so it’s easy to lose concentration. Conversely, many of the details you stored in short term memory the first time round will have left you because short term memories are stored for only a minute or so in our brains. The result is often a performance which is worse the second time! Don’t get overconfident, but instead concentrate even more to produce a better version second time round.

Looking for practice material?

As I mentioned earlier, there are plenty of sight reading books available to buy, many of them published by the various grade exam boards. There are some great resources available online too. These are the ones I’ve discovered while researching this post but if you know if others please do share them in the comments below.

Practice Sight Reading

A handy website where you can hone your rhythm reading skills at different levels. It’s free to use, but there is an monthly subscription option if you want more bells and whistles.

8 Notes

This site offers sight reading music for a plethora of instruments, including recorder. You can also browse for different styles of music, or even select pieces in particular keys if you want to polish up reading in sharps or flats. Some pieces have accompaniment, to keep you on the straight and narrow, while others are unaccompanied.

Sight Reading Factory

This is an automated site where you can customise the settings, specifying different parameters to help you practise. For instance, you could choose a piece for bass recorder, with a key of two sharps and incorporating triplets.

International Music Score Library Project

IMSLP is a wonderful resource, full of copyright-free music for every instrument you can think of. I often use it to identify fresh consort pieces or repertoire I could arrange for recorders. There’s no reason why you couldn’t use it for sight reading repertoire too though. Searching for ‘1 recorder’ brings up no fewer than 154 pages of suggestions - enough to keep you occupied for several lifetimes!

I hope my thoughts offer you some help with your sight reading. It’s a skill worth practising and polishing as the ability to read fresh music quickly and accurately is so important. If you’ve got your own tips and tricks which you’d like to share please do leave a comment below.

How do you hemiola?

Most recorder players feel at home playing Baroque music. After all, the period between around 1600 and 1750 was the heyday of our instrument, with composers like Handel, Bach and Telemann producing exquisite solo and chamber music for the recorder. However, there’s one rhythmic feature of Baroque music which often creates confusion and concern among recorder players - the hemiola. As we shall see, the hemiola wasn’t restricted to the Baroque period and can be found in repertoire as disparate as Susato and Brahms.

When conducting recorder ensembles, I often ask if everyone knows what a hemiola is when we encounter one. Usually, I see a handful of confident nods around the room, but these are invariably outnumbered by people who either look at me blankly or else suddenly find the floor immensely interesting! My aim today is to help lift the mists of rhythmic confusion, to assist you identifying and playing them with more confidence.

What is a hemiola?

Put simply, it’s a temporary change to the music’s regular rhythmic pattern, changing groups of three beats into groups of two. It’s always simplest to explain such concepts with musical examples so you can actually see them in practice. Take a look at this extract from Lully’s Bourgeois Gentilhomme:

The time signature gives us three beats in each bar. The first beat of the bar is the strongest, so the hierarchy of beats in bar one is strong-weak-weak. The same applies to bar 2. Now look at bars 3 and 4 and see how the rhythm changes. Instead of three crotchet beats we have three minim beats spread over two bars. With a note held across the barline, there’s no way to emphasise the first beat of bar 4, so instead stronger pulses occur every two beats, rather than every three. This is a hemiola.

This particular example is about as simple as it gets with hemiolas - all five voices play the same rhythm so the effect is inescapable. Unfortunately, not all hemiolas are so obvious. If you glance at bars 6 and 7 you’ll see a very similar rhythm, but here the highest voice deviates slightly from the pattern. The overall effect is still a hemiola but slightly less clear cut.

If you find it easier to understand this concept visually I recommend watching this video, created by the Orchestra of the Age of Enlightenment, which uses different examples to help explain the hemiola further - including a juggler! The video also includes the Lully example I showed above, among others.

Why do we have hemiolas?

There are several reasons why a composer might wish to include a hemiola in his or her music - let’s look at them..

To add rhythmic interest

Shifting between groups of two and three beats brings an extra layer of variety and energy to the music. Brahms does this a lot in his music, sometimes bringing hemiola shapes into different parts independently. Recorder players don’t often get to play Brahms, but the same things happens in earlier music too. In The Fairie-round Anthony Holborne shifts endlessly between duple (2) and triple (3) time rhythms. Sometimes the parts shift between meters simultaneously, but often they work independently of each other. sometimes simultaneously. I’ve altered the colour of the notes in this extract to show the triple time rhythms in red, while the duple time rhythms are blue. Click on the image to see it enlarged. If you’ve ever tried to play the Fairie-round you’ll understand why it can be so tricky to put together!

To speed up the musical movement

When you create a hemiola you shift from having a strong pulse every three beats to one every two beats - this gives a sense of the pulse increasing in speed. I’ve added a drum line to the Lully example shown above, placing a drum beat on the stronger pulses. Notice how the speed of the pulse increases when the beat occurs every two beats rather than every three beats.

An aural guide to the music’s phrasing

This is perhaps the most important function for a hemiola, especially in Renaissance and Baroque music. While modern music can be hugely complex, early music frequently contains more consistent and predictable harmonic and rhythmic patterns. That’s not to say it can’t be surprising, but there are melodic and rhythmic features which crop up regularly - for instance trills at cadences in Baroque music.

The hemiola is one such musical feature and composers use it to flag up to the listener that we’re approaching the end of a phrase. Of course, it’s unlikely that you’ll sit there thinking to yourself, “Oh, there’s a hemiola - that must mean it’s the end of a phrase!”. But if you listen to music from this period often enough you’ll subconsciously sense the movement of the rhythm and harmony, feeling a sense of arrival as the music reaches a cadence.

The biggest clue is the rate of change in the harmonies. Very often there will be just one or two chords or harmonies in each bar. At the hemiola this alters, as the harmonies change more swiftly. For instance, listen to this short movement by Gottfried Keller and notice how the rhythm and harmony shifts up a gear just before the cadences. If you’re not sure where the cadences are, listen out for the trills which also occur then. If you’d like to follow the music as you’re listening click here.

Where do hemiolas happen?

Generally hemiolas occur in triple time music - that’s music which has three beats in each bar, say 3/4, 3/2 or 3/8. Let’s look at a few examples.

The first comes from Handel’s Music for the Royal Fireworks - a short extract from the Minuets. The music is in 3/4 time but two bars before the end of the phrase (look out for trills as these often occur at cadence points too) the harmonies change from mostly being one chord per bar to three chords spread over two bars - shown by the boxes.

If you’d like to try this example for yourself you can play among with my consort video of the minuet here.

Minuet from Handel’s Music for the Royal Fireworks - click on the image to see it larger

Now let’s take a look at a hemiola in minim beats - this time taken from Handel’s Recorder Sonata in D minor. If you look at the boxes, you’l notice the first first two beats (box 1) include notes which are predominantly from one chord - A major (A, C sharp and E). The second box contains two different chords, but the final one is once again made up almost entirely of A major.

Handel recorder Sonata in D minor, 2nd movement

As a further example, here’s a short snippet from another of Handel’s recorder sonatas - this time in C major. The time signature is 3/8 - three quaver beats (or one dotted crotchet beat) per bar. In bars 46 and 47 he changes this to have rhythmic groups of two quaver beats. The hemiola is clearest in the recorder part, where the silence on beat one of bar 47 means the emphasis inevitably shifts to the dotted quaver note on the second beat of that bar. This particular movement is littered with hemiolas just like this, introducing a delightful shift from the one in a bar feel elsewhere in the movement. You can listen to the whole movement below.

Handel Recorder Sonata in C major, 2nd movement

Of course, there’s no such thing as a rule that’s never broken, so occasionally you’ll find hemiolas in unexpected time signatures. In La Paix Handel writes in 12/8 time, but still manages to squeeze a hemiola in at the cadences! The music isn’t in triple time, but as the dotted crotchet beats each contain three quavers Handel can group those quavers in twos rather than threes, thus creating a hemiola. Take a look at the top three parts where I’ve added the boxes and you’ll once again see the beats grouped in twos - predominantly either crotchets or as pairs of quavers.

La Paix from Handel’s Music for the Royal Fireworks

Finding the hemiola in its natural habitat

Let’s take a look at the most likely locations for hemiolas…

Cadence points

In Renaissance and Baroque music hemiolas almost always occur immediately before a cadence. These are the points where the music comes to rest momentarily, giving a sense of arrival. If you’re not sure what a cadence is, think of them as the musical equivalent of punctuation in written text. When reading text aloud, the commas and full stops tell you where to take a moment to allow a point to sink in, allowing both you and your listeners a moment to breathe. A cadence has the same purpose, bringing a sense of pause or arrival in the music. Play through any of the examples I’ve shared so far today and you’ll feel this sense of arrival on the note or chord immediately following the hemiola.

When you learn a new piece of music, listen out for these moments of repose as they will guide your phrasing. If the music is in triple time (3/8, 3/4 or 3/2) or in 6/8 you may well find a hemiola in the bar or two immediately preceding these cadence points.

Take a look at this section from Andrew Parcham’s Solo in G, where I’ve marked two hemiolas. Both come at cadence points and if you try playing the top line you’ll no doubt feel that moment of arrival on the note immediately following the hemiola. The composer would almost certainly have expected the performer to add a trill to the final dotted crotchet of each hemiola too - as you can hear in the recording below. The Allegro begins 2 minutes and 27 seconds into the video.

Andrew Parcham Solo in G

Look for trills in Baroque music

As I’ve already mentioned, cadence points are often decorated with trills in Baroque music. These aren’t always marked in the music because composers generally assumed the musicians would be familiar enough with the musical style to know where they should be added. But some did take the trouble to notate them and you’ll often find places where modern editors suggest adding cadential trills. These can be an additional way for you to spot where a hemiola may be lurking.

Look at the whole score

Perhaps the most important piece of advice I can give is to look at the whole score of the music, not just your individual part. Sometimes the hemiolas will be clear as day in your line, but, as we’ve seen in some of the examples I’ve shared, it’s often easier to spot the hemiola when looking at several parts together.

For instance, look at this extract from a Ronde by Tielman Susato. If you’re playing the top line, reading from a single part, you’d be forgiven for missing the hemiola entirely because both bars look like standard 3/2 rhythms. Cast your eye down through the score though and the hemiola becomes much clearer, with a two beat note at either end. Here the top line is simply providing rhythmic contrast, but the overall effect is definitely a hemiola.

Susato Ronde

Look for the rhythmic clues

Very often a hemiola’s effect is amplified by the use of longer notes, which have more weight or aural mass, as I like to call it. Look through any of the examples I’ve shared here and you’ll see time and again, how the composer fills one or two of the hemiola’s three parts with a longer note. This length and weight of these notes makes that section of the hemiola feel more significant, emphasising the fact that he or she is moving the musical stresses away from their usual position on the first beat of the bar.

For example, look at the last few bars of Telemann’s Concerto in C below - at the hemiola you’ll see I’ve circled the dotted crotchets in red. These notes will naturally draw the ear because they’re longer than the other note values within the hemiola. This brings the hemiola effect out effectively, especially if the quavers are kept detached and light.

Telemann Recorder Concerto in C, 4th movement

Look for consistency of rhythm through the texture.

As we’ve already seen, the hemiola rhythm doesn’t always appear in every voice, but often there will be some unanimity. Take a look at this Galliard by Anthony Holborne and you can clearly see a consistency of rhythm between the five voices. Unlike the Lully we looked at first, the parts aren’t entirely unanimous in their rhythm, but in both hemiolas several voices simultaneously have the same rhythm. Looking at the score, it becomes clear there’s a move away from the usual 1 2 3 - 1 2 3 rhythm to a hemiola pattern.

How do I play a hemiola?

Once you’ve identified your hemiola it’s very tempting to emphasise the start of all three sections to hammer the point home. Undoubtedly this will make your hemiola stand out, but it’ll likely lack subtlety!

A better approach is to think in terms of only emphasising one or two sections of the hemiola, which will result in a more subtle, musical effect. For instance, there are two hemiolas in this section of Purcell’s Chaconne from The Gordion Knot Untied. Both begin and end with dotted rhythms, which will naturally attract the most musical weight because of their longer length.

Ordinarily, the first beat of each bar would be the strongest, but here the aural mass of the dotted crotchets moves the emphasis onto the second beat of bars 52 and 59. Now you could also put some added weight onto the last beat of bars 51 and 58 to bring out the middle section of the hemiola. However, the result would be rather heavy and a better approach is to make the middle section of the hemiola light and less important. In this case I’d simply make the crotchets which fall within the second box of each hemiola short and light, creating a sense of lift and bounce. You can hear me putting this approach in practice in my consort video of this piece here.

Let’s take a look at another example, this time from Handel’s Recorder Sonata in B flat.

If you listen to this recording by David Antich you’ll hear the ensemble allow the longer notes to have some weight, but the cellist keeps the crotchets in the bassline light and separated, so as to minimise their importance and help highlight the rhythmic shift of the hemiola.

Looking beyond early music

As I said earlier, hemiolas aren’t restricted to the music of the Renaissance and Baroque - later composers used then too. One of the most famous appears in Leonard Bernsteins’s score for West Side Story and you’ll almost certainly be familiar with the shifting rhthms in America. But had you ever thought of it as a hemiola? You will now! Take a listen - the famous melody line begins around one minute and fifteens seconds into the video below.

Another example occurs in the opening bars of the Concierto de Aranjuez by Joaquin Rodrigo. The solo guitarist opens the whole work with the rhythmic pattern shown below - a clear hemiola in 6/8 time.

As I said at the beginning, Brahms wrote hemiolas too and you’ll find them dotted about endlessly in his music. Very often he chooses to write hemiolas independently in different voices but in this example, from his Intermezzo No.1 for piano, he shows them very clearly together. Normally in 6/8 time the quavers would be grouped in threes (as they are at the beginning of the extract) but on the second system here he writes a series of crotchets - notes worth two quavers - to create a series of hemiolas.

Johannes Brahms Intermezzo No.1 for piano

Are the hemiola mists clearing?

I hope my explanations and all these musical examples have helped you to understand the hemiola better. Don’t be afraid of them, but just be aware of their existence when you meet pieces where the note patterns are grouped in threes. Take every opportunity to consult the score, as you’re more likely to see them there, and don’t hesitate to experiment with your phrasing and articulation in bars you think may be hemiolas. These fascinating rhythmic patterns don’t bite and they can bring more variety, light and shade into your performances.

Finally, if you have a trick for spotting or dealing with hemiolas which I haven’t mentioned please do leave a comment below so we can share our ideas and musical knowledge.

Golden rules for recorder players

You like to think of yourself as an individual, don’t you? We all do, but the truth is we’re far more alike than we’re sometimes willing to admit.

When I began the Score Lines blog, just a few weeks ago, I started by sharing Walter Bergmann’s Golden Rules with you. Sadly I never met Walter, but I wouldn’t mind betting he came up with his pithy comments in response to situations he encountered when working with recorder players. Over the last three decades I’ve conducted and coached groups of recorder players of all ages and backgrounds and I too have found similarities in the mistakes they make. As a result there are phrases and tips that I find myself offering on a regular basis. Granted, my ‘golden rules’ may not be as pithy as his, but I wouldn’t mind betting Walter Bergmann would recognise some of the habits I encounter among players today!

Should you worry that you’re making the same mistakes as others? Absolutely not! While we all have different tastes, skills and characters, we are fundamentally made of the same stuff - it’s inevitable we’ll share some of our faults too. I hope there will be at least one nugget here which may help you identify and iron out some of your flaws. Remember though, none of us is perfect so don’t worry if you recognise your own playing in a few or many of my points. One of the best ways we can learn is through our mistakes, so you’re just taking steps towards a new, improved you!

1.      Just wiggle your fingers and blow!

This may seem a very simplistic suggestion, but it reflects two things - our human inability to multitask and the way we tend to overthink what we do.

When working on a tricky piece of music it’s easy to be so focused on just getting your fingers and tongue around the notes that we forget to use sufficient air. As a result our tone quality suffers. I’ll often remind groups to think about their breathing and blowing as well as their fingers and it’s astonishing what a difference it immediately makes to their sound.

This isn’t the only situation where I’ll quote these words though. In lessons I often find pupils are so focused on playing every single note that they get stuck in a spiral of over-cautious, slow playing. Sometimes throw caution to the wind and have a go at that tricky passage up to speed - literally throw your fingers at the notes and see what happens! It’s a really useful way to take stock and discover how far your diligent practising has got you. Some bits will be surprisingly good, while the added burst of speed will reveal the areas which still need more work. Go on, be brave - just wiggle your fingers and blow once in a while!

2.      How long is a minim?

This is a question I often pose to groups and they look at me as though I’m asking the strangest question in the world! Of course, the answer is two beats. But how many beats do you need to be aware of when playing a minim? Then it’s three beats! Confused? Look at this graphic illustration of a minim note within a bar of four beats.

See how the minim begins at the start of beat 1 but doesn’t end until the point where beat 3 begins. Next time you have a long note followed by a rest, think about where the note ends as much as where it begins. Inadvertently shortening a long note can have a detrimental effect on the placing of what follows, especially if this shortening creates a big hole in the music. Equally, there will of course be places where you cannot hold a note absolutely full length because you need to breathe and still be on time for the next note, so this isn’t a ‘one size fits all’ tip.

3.      Very few things in recorder playing can’t be improved by breathing

One of the greatest crimes in recorder playing is under blowing. Scrimping on the air you put through your recorder produces a weedy, undernourished tone and will compromise your intonation too. Remember, recorders are designed to be played with a particular flow of air. If you put less breath than this through your instrument some notes will be flatter than others. Groups I coach never fail to be amazed how much their tuning improves when they simply put use more air. A simple thing but with huge results. It’s easy to get hung up on desperately eking out your supply of air in order to get to the next breath mark. If this results in a weak tone you simply need to find an additional place to breathe.

If in doubt, open your mouth and breathe - your recorder will always thank you for it!

4.      Finish your phrases with finesse

Do you ever have that feeling of “thank heavens I got through that phrase in one piece!”? Of course you do - we all have!

Now think about the final note of that phrase - how did you play it? Was it a much loved and beautifully shaped note, or a huge bump of relief? I bet it was the latter! Next time you’re playing, take care of all your notes - even the last one. Endings matter and a comment I once heard from a Royal Marines bandsman expressed this perfectly - “An audience can forgive anything, as long as you start and finish well and have shiny shoes”! Ok, I know (as did he) that’s a huge simplification, but you get the point. Always care about your music, right up to the last note.

5.      Feel your dots actively

Back in the days when I taught the recorder in schools I’d often ask the children how many beats a dotted crotchet was worth in this rhythm:

A common response was, “One and a bit beats, Miss”. Not quite the precise answer I was hoping for, but it’s an approach I see in adults too. Of course, the correct answer is one and a half beats (unless you’re counting in 6/8, that is) – but how to do you count that half beat?

Most people understand the need to count ‘1, 2 and’ where the and is the quaver that follows the dotted crotchet:

However, in my experience, all too often musicians don’t feel that second beat actively enough. As a result, the quaver occurs in a somewhat nebulous timeframe, rather than precisely a beat and a half after the dotted crotchet. The solution to this problem? Simple – just feel the second beat more actively. Do this and you’ll know exactly where the quaver needs to be placed, then your rhythms will also knit together precisely.

6.      Dotted notes and ties shouldn’t feel nauseous

Those of you who’ve worked with me in person know this is one of my favourite bugbears. If I had a pound for every dotted or tied note which had an ungainly bulge in the middle I’d be a millionaire. The reason this happens is because you’re feeling the rhythm and that is no bad thing. However, take care to feel the dot or the tie in your head, not through your breath. By all means allow your tone to build through a tie or dotted note, but do it with a progressive intensification rather than a nauseous lurch! If you’re not sure whether you have this bad habit, try recording yourself playing music which contains some of these patterns (the voice memo app on a smartphone is handy for this) and you may find it surprisingly revealing….

7.      Always sight read at full speed

This is a piece of advice I was given by a fellow conductor many years ago which is absolutely true. When I run a new piece with a group of musicians I always begin at full speed. Yes, there will be plenty of wrong notes and other blunders, but it plants the correct speed in their minds. First impressions are important - think about the way we judge people based on first encounters. The same applies to music. If you start off slowly your brain will always remember the slower tempo. But if you jump in at full speed, warts and all, you’ll remember that and it’ll it easier to work back up to full tempo as you practise.

8.      Are you watching carefully?

I know I’m not the only conductor who berates groups for not watching the beat closely enough. No doubt the practice of ignoring the conductor has been going on since we moved from thumping a stick on the floor to waving a stick in the air. But do you really need to watch every move the conductor makes? Actually, no!

In an ideal world I’d love it if you watched me like a hawk, taking in every little gesture thoughtfully created to help you play the music. But that sort of attention requires you to all but memorise the music and we all know that’s unlikely to happen. Instead, try putting your music stand at a height where you can see the music clearly but where you can also see your conductor in your peripheral vision. Next time you practise, take moment to focus on your music and note how much of your surroundings you are aware of at the same time. Yes, whatever’s in your peripheral vision isn’t clearly in focus, but trust me, you really don’t need to see me in perfect clarity! Just being aware of the movement of the conductor’s beat will help you keep better in time, and you can look up when necessary to take in other gestures.

 9.      Breathe in sympathy with the music

Imagine you’re about to play a fast piece of music – what body language clues do you expect to receive from whoever’s leading your ensemble? Almost certainly, a brisk lift of their instrument and a speedy intake of breath. How about if they move gently and take a leisurely breath in? I’m willing to bet you’d expect a slower tempo.

The way we breath when playing has a huge influence on our playing and the musicians with whom we play. Next time you practise, try taking different speed breaths and note how it encourages you to play the music differently. A slow breath implies a relaxed tempo, while a sharp intake of breath suggests something more dynamic. While you’re at it, do breathe in time with the pulse during the music and you’ll almost certainly play more rhythmically.

10.  Don’t fight your recorder!

All too often I hear recorder players doing battle with their instrument.

On a Baroque recorder your bottom notes will naturally be soft, while the higher registers are louder and more piercing. You want stronger bottom notes? Try a Renaissance recorder, whose bore is wider at the bottom, resulting in fruitier low notes. The downside? You may have to sacrifice the ease of the highest notes. Every recorder is a compromise and this is the price we pay for choosing an instrument which hasn’t evolved significantly since about 1750.

Of course, not all composers understand this. We’ve all come across pieces where a bottom note is marked forte or a composer who demands a pianissimo top note. Instead of trying to force your instrument to achieve the impossible, I would encourage you to be sympathetic to your recorder and allow it to sing to its best ability.

Let me share a practical example with you….

Last week I rehearsed my recorder orchestra in a piece which ended with a piano low F played by the contrabasses, while the rest of the orchestra followed on with a chord above that. Players of big basses spend a lot of money to buy their instruments – effectively paying for the low notes other recorders cannot reach. Of course you want value for money, so I wasn’t surprised when my contra section gave that bottom F all they had, going for a full on fruity sound! Was it a pleasant effect? Frankly, no! Instead I encouraged them to soften their faces and throats, breathe deeply and blow in a gentle, relaxed way. What a difference! Suddenly we had a beautiful, warm but piano tone which didn’t set my teeth on edge. Even better, the instinctive reaction of the rest of the orchestra and their murmurs of approval showed they liked it too! As soon as the contras played their bottom F in its sweet spot, rather than trying to make it bigger than was practically possible, the effect was glorious.

My advice to you is to think about what is realistic and pleasurable when playing the recorder. Yes, you may not achieve the dynamics the composer demands, but the result will be much more enjoyable and your notes will sound better. Use a slower, gentle airflow for low notes to make a sweet, relaxed sound. For higher ranges plan ahead and be ready to use faster moving breath so your notes speak with ease. Play with sympathy for your instrument (and remember different makes and models of recorder have different needs) and you’ll play more beautifully.

11.  Don’t be afraid of high notes

My clarinet teacher used to tell me that high notes need to be tamed in the same way you would train an over-eager dog. Rather than being hesitant, showing your fear, you need to be confident and assertive, showing them who’s in charge! The same principle applies to the recorder.

How often do you see a top note looming on the musical horizon and feel a cold stab of dread in your heart? What happens when you get to the note? I imagine you may well tense up, blow tentatively, tongue the note for all you’re worth and jam your left thumbnail into the hole in desperation. The result? If you’re lucky, a tight, squeezed tone and if you’re not, a complete disaster!

Here’s a better strategy….

Breath deeply beforehand, so you have plenty of fuel to create the faster airflow high notes demand. Think about just how fast the air needs to go before you hit the note – plan ahead. Tongue gently – high notes are far more likely to split if you hammer them out with force. Finally, think about your left thumb position. Open the thumbhole a small amount. Open it too far and the note will fail entirely, but close it too much and you’ll get a rough undertone. Better still, regularly practise plucking high notes out of nowhere – that way you’ll learn the needs of your instruments so you can find them with ease in the field.

12.  Make your conductor happy by using your pencil!

If there’s a sound that makes me happy it’s the clink of a pencil being placed back on a music stand. Does this make me strange? Well, that’s for you to decide! Seriously though, there’s absolutely no shame in writing on your music if it helps you play better.

I write things on my music all the time. I know from experience that if I don’t, I’ll forget crucial details and will make mistakes. My rule of thumb is if I’ve made a mistake more than once I need to write a reminder in my music. Doing so ensures I don’t have to think so hard about the basics (accidentals which continue through the bar, the breakdown of tricky rhythms etc.) and instead I can focus on real music making.

I have a fascination about the way the human brain works and have recently read several books on the subject. It surprised me to learn that our short term memory is a minute or less. That means if you make a mistake while practising but then carry on to the end of the piece you may well have forgotten what that mistake was by the time you come to write a reminder in your music. Instead, stop straight away and make a note of that missed accidental, or incorrect rhythm.

One of the ways we move patterns and actions from short term to long term memory is by repeating them. If you continually come back to that same accidental and play it wrong you are repeating and compounding the error. After a while the mistake gets stored in long term memory. We all know from painful experience that bad habits are harder to shift than creating new good habits. Unlearning an error is more difficult than learning it correctly from the start as you are having to overwrite an incorrect memory with a new correct one. If my audience includes any neurologists you may well be cursing me for oversimplifying this complex subject by now. However, if my explanation helps even one musician play more right notes I make no apology!

While we’re here, please don’t write cryptic symbols in your music. Instead use words or symbols you’ll still understand in a month’s time. I once asked a pupil of mine what the exclamation mark written above a note in her score meant and she had to admit she couldn’t remember! If she’d used an accidental or a word whose meaning was obvious she’d have avoided making the same error over and over again.


So there you have a dozen of the things I find myself saying to recorder players everywhere on a regular basis. No doubt others will spring to mind as soon as I publish this week’s blog, but I hope these tips will at least make you think and help you play better.

Do you have any handy hints and tips you’d like to share with our recorder community? It doesn’t matter how large or small they are - if they help you they’ll help others too! Please do share your thoughts in the comment below – let’s see if we can all learn from each other.  

Decisions, decisions…

Musical notation comes in incredibly varied forms. Most music composed since the mid-19th century contains clear instructions from the composer, showing us where he or she would like us to begin our interpretation. That’s not to say we don’t still have musical choices to make, but generally the music gives us a clear starting point.

Now look back in time. As we travel back through the musical periods, composers give us fewer clues, expecting us to already have sufficient knowledge of the appropriate musical style to be able to make the necessary choices. This can be bewildering – so many decisions to make, but where to begin?!

Handel’s manuscript of his Recorder Sonata in F major

How should we make these decisions?

In an ideal world you’d go back to some original sources, to learn directly from composers and writers of the period.  A great starting point for this is On Playing the Flute by Johann Joachim Quantz – a book I’ve talked about before. If you want a glimpse into the 18th century musical mind and an opportunity to pick up lots of helpful tips I strongly recommend you purchase a copy of this iconic book. Quantz helpfully breaks his advice down into user-friendly chunks, so it’s easy to dip in to find the information you need.

For the purposes of this blog post I’m going to concentrate on Baroque music, but many of the same principles can be also used in other repertoire. To illustrate my ideas I’ll use the first two movements of Handel’s Recorder Sonata in F – a piece of music I imagine many of you will already be familiar with. To make life easier, below you’ll find buttons which link to two different editions of this famous sonata.

The first is a facsimile of the sonata from a collection published by John Walsh in London in 1732. The notation is very clear and typical of the type of edition with which Handel’s contemporaries would have been familiar. The music includes only the recorder part and bassline, along with figured bass. Using the bassline and figures the harpsichordist is expected to improvise a performance, allowing complete autonomy over the style and mood of the accompaniment. As a recorder player, being able to see the shape of the bassline is also helpful as you can immediately see the conversation between the two voices.

Secondly, we have a modern edition of the piece, which includes a full realisation of the figured bass – probably the type of edition you’ll be more familiar with.

Taking your first steps on the road to an authentic Baroque style

I’m going to break down the elements of Baroque style, although these inevitably overlap in places. As you gain in confidence and experience you’ll be better able to assess some of these elements ‘on the hoof’, as you sightread. Of course, no one can be expected to form a final interpretation of any piece while sight reading, so don’t worry if at first all you can do is get around the notes and rhythms. As you get to know the music better, try to use some of the self-awareness techniques I discussed in my last blog post to think about the musical possibilities.

Let’s take a look at some of the elements you should think about as you get to know the music better…

Select your tempo

This really needs to be your starting point. Look at the composer’s tempo markings and identify what they mean. If the markings are in a language you don’t speak, go and look them up! Wikipedia has a pretty comprehensive glossary of musical terms here which you might want to bookmark.

Now play the music at what you think is an appropriate speed and consider what mood or character the composer is trying to conjure up. For me, the opening Larghetto of the Handel is quite noble. The lines emerge gradually, building from a simple beginning, blossoming into more expansive shapes later. In contrast, the Allegro is a much livelier, skittish number. It seems to be itching to have some fun at the beginning, with energetic jumps and repetitions, finally leaping properly into action with the semiquavers at bar 6.

Assessing the mood and character this way will influence your choices later. Don’t worry if you can’t play everything in a polished way at this stage – it’s more a matter of deciding what character you want to project, even if technical limitations get in your way at first!

While you’re here, bear in mind what sort of key you’re playing in.  Major keys tend to be sunnier and more joyful, while minors are darker and more sonorous. That too may affect the way you decide to play the music, especially if the key changes en-route through the piece.

The implications of time signatures

Now check your time signature. How many beats are there in each bar and how do those beats break down? For instance, a piece in compound time (where the main beats subdivide into three rather than two notes – this sonata’s final 12/8 Allegro for instance) will perhaps have a more rustic, country dance-like feel than a movement in 4/4.

By the time we reach the Baroque period, composers habitually use time signatures to show how the music is constructed – unlike the freer, unbarred music of the Renaissance. In the Baroque style there is a clear sense of hierarchy within the beats of each bar - the first of which is always the strongest. Bear this in mind as you play, as using an equal weight on every beat of each bar will quickly become very repetitive. Try playing the first few bars of the Larghetto with an equal weight on every beat. Then have another go with a gentle emphasis on the first beat of the bar, while making beats 2 and 3 less insistent. Note now this helps the music flow more elegantly.

In time signatures with more beats per bar things become a touch more complex. In four, for instance, you could illustrate the hierarchy of the beats graphically like this…

Beats 1 and 3 are subtly different, but definitely the most important as they begin each half of the bar, with beat 1 being the strongest. Next in the pecking order comes beat 4 – this is because it’s the one that leads us onwards into the next bar. Finally, the runt of the litter is beat 2, the weakest part of the bar. Awareness of this musical hierarchy can help you bring more subtlety to your playing.

Turning notes into musical sentences

Now turn your mind to the phrasing of the music. Compare music to the spoken word. Musical phrases, like spoken sentences need ebb and flow, rather than a continuous, shapeless stream of notes. In text we have punctuation to help us create sense from the words, but in Baroque repertoire we have to figure out the musical sentences for ourselves.

Baroque music is often quite straightforward in its shaping, with phrases tending to come in multiples of 2, 4 or 8 bars – think of it like a poem with a regular number of syllables in each line. With this in mind, look at the music and see if this reveals natural places to breathe. If the music begins with an anacrusis (an upbeat of some sort, perhaps a single beat or half beat note) subsequent phrases will almost certainly follow the same pattern.

For instance in the Larghetto, the recorder part begins with two crotchet beats. If you look at this passage, you can see I’ve added a breath mark before each of these two beat patterns. If you look at one of the scores, you’ll see the bassline also begins many phrases with the same two beat pattern.

In contrast, the Allegro has a single quaver anacrusis and this pattern also repeats throughout the movement.

All the breath marks in this section come before a quaver upbeat

Naturally, there will be instances where the composer changes things up to add variety, so don’t be afraid to try different approaches and see which you like best. Sometimes the phrasing becomes more obvious when you play the music with its accompaniment – hearing the harmony beneath your line can clarify things.

Adding light and shade through articulation

In modern music we expect composers to tell us precisely how they wish us to articulate their notes, through slurs, staccato, accents and the like. Baroque performers, by contrast, were expected to have an innate understanding of the prevailing musical style and to shape their performances accordingly. Obviously, we can’t travel back in time to talk to 18th century musicians, so this is where resources such as Quantz’s book come in handy. If you listen to older performances of Baroque music you’ll often hear lush, heavy string playing, which owes more to the Romantic period than authentic playing practice.

A lush, romantic interpretation of Bach’s Air from his Third Orchestral Suite by Herbert von Karajan and the Berlin Philharmonic

With the early music revival of the 1960s performers began looking more closely at the practices of the period, introducing greater light and shade into their interpretations, alongside the use of original instruments, or faithful modern copies of period instruments. Much of the variety you find in these performances of Baroque music is created through the use of articulation.

A historically aware performance of the same piece by the Academy of Ancient Music

With a blank canvas to work from (Baroque composers rarely give more than the occasional slur or staccato mark) the possibilities can seem overwhelming. I have a few simple guidelines which I hope will help you come up with your own personal interpretation. I hesitate to call these ‘rules’ as that suggests they are things you must do. Instead, think of them as a starting point and remember too that rules are made to be broken!

Here are the basics ideas I suggest to my students when they’re trying to find a Baroque style, along with some examples from the first two movements of the Handel Sonata:

Slow movements will often be more suited to legato playing than fast ones. But that’s not to say everything should be silky smooth. Try making weaker beats in the bar (see my earlier comments about their hierarchy) a little lighter, and less emphasised to bring in light and shade. Likewise, upbeat notes may want to be lighter/shorter so they don’t become too heavy and distract from the stronger beats.

In fast movements look at the prevailing note values. As a starting point, make the fastest notes mostly smooth (semiquavers in the Handel Allegro), while the second fastest note values (quavers in this case) can be more detached.

The first section of the Handel Allegro with staccato marks to show where I would lighten the quavers. Notice how I choose to play some of the stepwise quavers smoothly.

Now look at the melodic shapes within these detached quaver passages. Leaping notes and repeated notes will often need to be the shortest, while stepwise movement might be better played more smoothly. It’s not a one size fits all rule, but a mere starting point. Notice too, how I use staccato less often on the first beat of the bar, so as to create that sense of hierarchy between the beats.

Be aware of times when the tonality changes between major and minor. A major section may feel absolutely right played in a staccato style, while a similar shape in a minor key might benefit from a more legato approach.

You’ll notice I’ve made no reference to dynamics so far. This is largely because of the recorder’s limited dynamic range. The concept of playing pianissimo or fortissimo is not really relevant to the recorder, but that’s not to say dynamics are impossible. Instead I would suggest you focus more on using a variety of articulation (staccato, legato, accents, slurs) to add variety to your performances.

To add dynamic rise and fall think instead about using the recorder’s natural dynamic range (stronger on high notes, weaker at the bottom) to create a sense of line and shape. For instance, in the sound clip below, the dynamic of the music increases and decreases naturally as the musical line climbs and descends.

To slur or not to slur?

As I’ve already mentioned, few Baroque composers offer much in the way of slurs in their music. Two notable exceptions among recorder composers are Georg Philipp Telemann and Francesco Barsanti. Both were recorder players themselves and therefore knew what best suited the instrument. This means the slurs we encounter in their music work well and can offer ideas we can use elsewhere. For example, here are two snippets by Barsanti and Telemann.

An excerpt from Barsanti’s Sonata in D minor, where he slurs three stepwise notes together within a group of four

In his Sonata in C major, from Der getreue Musik-Meister, Telemann chose to slur groups of six notes together, crossing between neighbouring beats

Sometimes adding slurs into the music can help with faster passages, especially if you’re not yet fluent with double tonguing. A few carefully placed slurs might give your tongue a little breathing space, but I would advise against using them all over the place simply as an excuse not to improve your tonguing!

Instead, look for patterns within the music which might benefit from slurs to add greater variety and interest. For instance, you could use Barsanti’s 1 tongued, 3 slurred articulation pattern, here in the Handel Allegro. Note how the pattern changes to 3 slurred and 1 tongued from the bar 23 to suit the changing melodic shape.

If you choose this route, try to be consistent, adding the same slurs whenever a particular melodic shape appears in the movement. That will bring an added feeling of cohesiveness and make their addition feel like a musical choice rather than something random!

Incidentally, a two notes slurred, two tongued pattern is almost non-existent in Baroque music. It’s much more typical of the Classical period, appearing in music by Mozart and his contemporaries. It may seem an easy choice, but often 3+1 or 1+3 will often be more appropriate, depending on the note patterns you’re playing.

Taking the terror out of trills

The subject of ornamentation can fill an entire book, so I don’t plan to cover it in too much detail here. However, I know trills often strike fear into the hearts of recorder players, especially when your main focus is just getting on top of the notes! However, I’d like to offer a few simple words of advice which may calm your quaking nerves.

What is the purpose of a trill in Baroque music?

In many types of music, trills serve a purely decorative purpose, but in the Baroque they have a different function. You may wonder why teachers and conductors insist on that Baroque trills should start from the upper note. This isn’t just because we’re contrary, but instead it performs an important harmonic function. The whole purpose of a Baroque trill is to create a moment of tension, followed by a feeling of release. The upper note of a trill almost always clashes with the accompanying harmony, creating a discord and a sense of tension. At the moment when your fingers move on, and you begin to wiggle between the two notes of the trill that tension is released.

A strategy for Baroque trills

For many recorder players, trills feel like a distraction, sent to cause them pain and panic. Instead of panicking about their busy-ness I would focus on that upper note. By spending a little longer on the upper note your trills will sound more expressive. It also means you don’t need to wiggle your fingers for quite so long – I think that’s what you call a win-win situation! It’s important to remember that the crucial upper note must begin on the beat and not before. If you start it early (perhaps to try and buy yourself some more time) it’ll be over before the chord it is designed to clash with is played, so the trill loses its entire reason for being.

Finally, don’t feel your trills need to be metronomic and the really fast throughout - this is especially important in slow movements. In slower music you can start to wiggle lazily and gradually wind the speed up. Once again, you reduce the number of wiggles required and your fingers don’t have to move quickly for so long. More importantly, your trills will sound more expressive and musical – another double bonus!

Where next?

I have three parting thoughts which will help you put some of my advice into practice.

The first is to listen to other performers playing Baroque music. Seek out good performers and really listen to how they tackle this repertoire.  Ask yourself about the speeds they’ve chosen and where they vary their articulation. How do they phrase the music? How do they create light and shade? Look for performances by respected professional players and remember you don’t just need to focus on recorder music. For instance, listen to the Bach Brandenburg Concertos and note how the string players vary their articulation and phrasing just as recorder players do. Yes, their playing technique is different, but the basics of Baroque style apply to any instrument.

The final movement of Bach’s fourth Brandenburg Concerto. Note how the strings and recorders all vary their articulation to bring the music to life.

Secondly, take risks and experiment! Take a single movement (I would suggest something simple at first) and spend time exploring several different ways to phrase the music. Try the articulation ‘rules’ I’ve suggested then play the music again, breaking the rules. Maybe make copies of your chosen piece and mark them up with different combinations of articulation and phrasing. Do this as many times as you like, but the crucial thing is to be creative and explore all the possibilities. You’ll discover some versions you hate and some you love, but most importantly it’ll get you thinking in a different way. Don’t be afraid to make mistakes – you learn just as much from these as from your successes.

Finally, be bold! I frequently find myself telling students to be more extreme in their creative decisions. It’s too easy to be half hearted in your approach for fear of going over the top and sounding too extreme. In my experience, people are often far too cautious, resulting in bland performances which lack musical interest. Recently I’ve asked pupils to play to me as I listen with a pencil and a copy of their music to hand. As a listener I should be able to understand their intent clearly enough that I can annotate my copy of the music with their phrasing, articulation marks and dynamic shapes simply by listening. You could even record yourself playing and then try this exercise – you might find it very revealing!


I’d love to hear your own tips for creating interesting performances. Or perhaps you’ve been to a concert which really stuck in your memory because it was so dynamic and exciting? What did you learn from the experience and how has it helped you become a better player? Do leave a comment below so we can all share our ideas.

Music making is an endlessly fascinating subject and you can look forward to a lifetime of creative experimentation if you keep an open mind!


Don’t forget, I’m still creating new Recorder Consort Videos, plus regular duets and trios-minus one. Recent additions have included a Fughetta by Glen Shannon, excerpts from Henry Purcell’s The Fairy Queen and a two voice Fantasia by Michael East. You can find all of them over on my Downloads page.