learning

Learn to love your scales!

What comes into your mind when you think about scales and arpeggios? Perhaps memories from childhood - being nagged by a teacher to practise? Or maybe even a degree of perplexity about exactly what they are?

Many of us have a love/hate relationship with scales. When I think back to my teenage years I realise I owe my music teachers an apology for my lack of application when it came to these fundamental exercises. Time and again I would spend the last two or three weeks before a music exam frantically cramming my scales and arpeggios instead of learning them gradually over a longer period, Fortunately for me, I had an uncanny ability to learn them at speed and I usually got away with this last minute feverish rush of learning. The downside was that I never really absorbed them thoroughly, so within a couple of weeks of the exam I’d forgotten them all again! My slapdash approach must have been infuriating, but those teachers I’m still in touch with seem to have forgiven me!

Of course the irony is I’ve seen the same situation from the other side of the fence many times during my teaching career, quietly trying cajoling my students to start learning their scales and arpeggios as early as possible…

What are scales and arpeggios?

The first movement of Telemann’s Sonata in F major which is built upon lots of scale patterns.

Scales and arpeggios are the fundamental building blocks of music and all western music is created from these patterns. A scale uses neighbouring notes, while an arpeggio uses the 1st, 3rd and 5th steps of a scale to create a broken chord, where the notes are played in turn to create a melodic line rather than as harmonies.

Major and minor scales contain eight different pitches within each octave, arranged in a particular combination of tones and semitones. On the other hand, a chromatic scale includes all 12 notes - just as you would if you played every black and white note in order on the piano.

You’re probably most familiar with the concept of major, minor and chromatic scales, but there are many more types besides. Pentatonic scales have just five notes (sound just the black notes on a piano and you’re playing a pentatonic scale), modes are created from the patterns made by playing the white notes of the keyboard in different combinations, and jazz musicians have their own varieties of scales.

They’re not just a feature of western music either - in some musical cultures other patterns are used. For instance, Indian music is based on ragas - scale patterns which can include intervals even smaller than our semitone.

Why do I need to learn scales and arpeggios?

This is a cry many teachers have heard from their students in frustration! While they may not seem terribly exciting, learning scales and arpeggios helps your music making in many different ways. Let’s look at some of them…

They help you gain fluency

If we’re to play music with ease and speed, fluency is vital. Getting to the point where your fingers automatically find the patterns needed for each note at speed will allow you to tackle ever more challenging repertoire. If you have to stop and think about which fingers to move before each note (as a total beginner might) your musical lines will lack a sense of flow.

Improve your sight reading skills

Because music is made up of scale and arpeggio patterns, being able to recognise and fluently play these combinations of notes helps you read unfamiliar music more easily. If you want a comparison, it’s a bit like learning to read text. When we first learn to read we recognise the individual letters. Gradually we learn that these letters often appear together in particular combinations so we begin to recognise syllables and ultimately whole words and sentences. The notes of a scale are like the individual letters, while a scale is a long word or sentence which we take in at a glance through familiarity.

Coordinating finger movements

One of the big challenges of recorder playing is the complexity of the fingerings. Modern wind instruments have keywork to help simplify the finger patterns. Recorders lack these, so instead we have to play complex forked fingerings (for instance B flat on the descant or E flat on treble recorder). Shifting between neighbouring notes can often involve moving multiple fingers up and down simultaneously. We can use scales and arpeggios to practise this and make our finger changes neater and quicker.

Coordinating tongue and fingers

Not only do we have to coordinate our fingers, but our tongue needs to match the speed of our finger movements too if we’re to play a genuinely legato melody. Once again, scales can be a useful tool to help achieve this.

Building up speed

Want to play faster? In that case you need to practise the patterns which occur most often in music and gradually learn to negotiate them more quickly. What’s the best way to do this? Yes, you’ve guessed it - scales and arpeggios!

Practising double tonguing

Once you’ve built up some velocity, you might need to explore double tonguing so your articulation can match the speed of your fingers. Again, using simple scale patterns are a great way to work on this without having to think about reading complex music at the same time.

For music exams

Most adult recorder players have no interest in working for exams, but if you’re someone who’s motivated by exams, you’ll need to learn some scales and arpeggios as well as pieces of music. The syllabus for the lower grades may only include a few different keys, but by grade 8 you’ll need to know all the major and minor keys.

Have I convinced you yet?

Assuming I have, you might well be asking some of the following questions…

Do I need to learn all of them?

In an ideal world, knowing all the major and minor scales and arpeggios (plus chromatic and other patterns) is a desirable aim. But this doesn’t mean you have to learn all of them! For anyone even learning a carefully chosen selection is immensely useful.

If you’re not sure where to begin, start by looking at the music you’re currently working on. What key is the piece in? For instance, if you’re playing a sonata with a key signature of two flats, try learning B flat major and G minor - the two scales with the same key signature. The music is likely to work through both of these keys at some point and if you can play these fluently the patterns you encounter in the piece will come more easily too.

Realistically, unless you choose to play Schickhardt’s set of recorder sonatas in every key, most music for our instrument explores a limited range of key signatures. It’s unusual to see recorder music in more than three sharps or flats, so I would recommend aiming for fluency in these keys before you worry about the exotic realms of D flat major or G sharp minor.

Do I have to learn them from memory?

This is a much debated topic among students and teachers. For music exams you’re expected to learn the prescribed scales and arpeggios from memory, but as we’ve already noted, many adult learners have no interest in testing themselves in this way.

In order to play scales fluently from memory you need to be completely on top of the finger patterns, knowing precisely which fingers to move between each note. This requires what is often called ‘muscle memory’, although in reality our muscles don’t have memories. This process is actually achieved by generating strong connections between our brains and the nerve pathways used to send instructions to the fingers. To achieve that (I plan to explore this more in a future blog post) requires lots of repetition, and in my experience, the process of memorising such patterns definitely seems to be harder for some people than others.

Memorising scale and arpeggio patterns presents a particular challenge for players of wind instruments. With the piano or a string instrument, there’s a logical visual pattern as you work your way up and down the keyboard or fingerboard. In contrast, each note on a wind instrument of any type requires a different combination of fingers. Yes, moving between some of these is fairly logical. But I’m sure you’ve noticed how that logic disappears when it comes to cross fingers (particularly flat and sharp notes) or the upper extremities of the recorder!

An additional challenge we face as recorder players is the limited range of our instrument. Most woodwind instruments can play scales covering at least a two, and sometimes three, octave range in all keys. In contrast, the recorder can comfortably manage a handful of scales at two octaves, but for most intermediate level players an octave and a half is the limit. This means scales come in different shapes to maximise the range we cover, either turning at the top or the bottom of the instrument. Remembering which scale follows which pattern is an additional thing to learn and can add extra stress to the process.

For my Score Lines subscribers I created scale sheets showing some of these patterns, which can be downloaded from your Members’ Area. I’ve linked to the treble recorder sheet here, but if you’d like access to all of them please feel free to subscribe here - it’s free and there are lots of other exclusive goodies for you to download besides the scales!

While learning scales and arpeggios from memory is undoubtedly desirable, I would argue that playing them from music is probably just as useful for most amateur recorder players. One of the most important skills to develop is sight reading (I’ve written a blog about this here) and being able to recognise scale patterns and convert them into fluent playing is a great way to achieve this. As with most skills, do this by starting slowly and gradually building up some speed.

How fast should I play them?

As with so many things, it depends! If you’re using a scale to develop your tone you might do best to play it very slowly - perhaps four beats on each note. But if fast playing is your aim you’ll need to take a different approach.

When I first started having lessons with Philip Thorby, I spent about three months solely working on slow scales and other exercises as we focused on developing my tone and legato playing. Ok, this may sound rather extreme, but I was aiming for a career as a professional player so it was absolutely necessary. My technique certainly benefitted from this approach and I finally began to understand scales and arpeggios in a way that set firm foundations for everything I was to learn later. Taking this approach with even just one scale and arpeggio can be hugely beneficial if it helps you focus on the foundations of your technique.

The most important thing is to play your chosen scale or arpeggio correctly from the very beginning. If that means you start out playing each note at a metronome speed of just 60 that’s absolutely fine, as long as the notes are 100% right. When you can consistently play all the notes fluently and cleanly at that speed, gradually increase the tempo until you reach your desired tempo, checking at every point that you’re still maintaining the same consistency and precision. A metronome is a really useful tool here to hold you at one speed.

How often should I practise my scales?

I’m a big advocate of little and often. Having a huge practising splurge on your scales just once a week makes it difficult to achieve consistent results. A much better way is to programme in short, frequent practice times - maybe five or ten minutes every day. This way you remind your fingers of the correct patterns at regular intervals so they become habitual more quickly. Perhaps even keep a recorder out at all times (a plastic instrument can be handy if you prefer to put away your wooden recorders) so you can pick it up and play a scale for a minute or two every time you walk by.

Which variety of minor scale should I practise?

Minor scales come in two different species - harmonic and melodic. Harmonic minors use the same notes whether you’re ascending or descending, so they’re slightly easier to memorise. However, they also include an augmented second interval (the 6th and 7th notes, which sound vaguely reminiscent of a snake charmer’s flute), circled in red below, which is less commonly used in western music.

A Harmonic Minor

In contrast, a melodic minor scale raises the 6th and 7th notes by a semitone on the way up and returns them to their original pitch on the way back down. This is an added complexity to memorise, but these melodic shapes (hence the name) are more frequently found in the music we play. For this reason, if your plan is to practise them with music and you only have time to work on one type of minor scale I’d recommend the melodics as a priority.

A Melodic Minor

Using scales and arpeggios creatively

Most readers of this blog won’t be looking to become professional recorder players, so being able to play in every key with total fluency and at high speed is probably not your aim in life! But you can still use these patterns to improve your playing and have some fun along the way. Here are a few ways you could use them…

Vary your tempo according to your intention

If you want to improve your tone you need to focus on quality rather than speed. For this I would pick an easy scale (perhaps no more than one sharp or flat in the key signature) and play it really slowly. By simplifying the notes you free up your brain to think about breathing deeply and blowing freely, producing the best possible tone on each note. Perhaps spend four slow beats on every note before moving on to the next, breathing as often as you need to, always focusing on using the optimum breath speed for each fingering.

If speed is your motivation, again begin at a modest tempo but focus on keeping your fingering even and well coordinated with your tonguing. Perhaps use a metronome to ensure you maintain a consistent tempo. As you perfect each speed setting, switch up the tempo by a small amount and repeat the exercise several times. If you begin to stumble, take the metronome down by a couple of notches and refine your playing before moving on. Be methodical in your approach and you’ll be surprised how much progress you can make in a fairly short space of time. If you’ve built up a good turn of speed with an easy scale why not take the tempo back down again and try it with a more complex key signature?

Experiment with different articulation patterns

The music we play often contains a wide variety of articulation, from long tongued passages to intricate patterns, where small groups of notes need to be slurred here and there. It’s a good idea to begin by practising scales and arpeggios smoothly tongued, staccato and in long slurs as these all demand different technical skills.

Alongside these single technique scales I recommend you also practise patterns that require you to mix slurring and tonguing - you can see some of my suggested patterns below. These are the sort of patterns you’ll encounter in the real world and if you can apply them to your scales they’ll seem less scary in context. These are just a few of my ideas, but don’t be afraid to come up with your own variations.

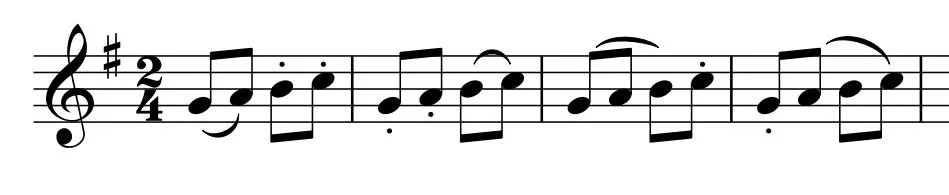
Four varied articulation patterns you could try out

Be playful

There’s no reason why you must always play complete scales. Don’t be afraid to be playful and creative. Breaking a scale down into groups of four or five notes, running up and down, may help you really master the transition between specific fingerings more quickly. Once you’ve got that fluency you can then glue these small groups back together into complete scales. For instance, you could break up the F major scale shown below like this:

Breaking an exercise like this down into bitesize pieces is a recognised technique, called chunking. It’s immensely useful as a means of building up fluency and consistency, allowing our brain to focus more efficiently on small amounts of information.

Explore different note patterns

Bored with just whizzing up and down your scales as printed? Why not add some variety and explore them by playing the notes in a different order? For instance you could play each one in thirds like this…

You could follow the same principle with fourths and fifths too, although these are harder….

If you’ve learnt every key how about mixing them all up together? One of my favourite challenges is to go up one scale, then move up a semitone and come back down the next one - for instance upwards through F major, down via F sharp major, up via G major, down via A flat and so forth. The same exercise is possible with the minor keys too. If you can play both of these fluently you can award yourself a generous gold star!

Major keys

Minor keys

Finally, look for the satisfaction in a scale played really well!

You may not feel the need to learn scales in every key, and for less experienced players such an aim may be too ambitious anyway. However, there’s a satisfaction to be gained from playing even one or two of them really well, even at a slow tempo.

Scales and arpeggios can be a valuable opportunity to find a contemplative zone, focusing on a simple task done to the best of your abilities. I enjoy spending a few minutes at the start of a practice session playing scales really slowly, closing my eyes and listening to my tone. I focus on the quality of my sound, tailoring the speed of my breath and the strength of my articulation to suit each individual note. By doing this I reinforce the good habits I’ve learnt over the years, as well as warming up mind, fingers, tongue and lungs before I move onto more demanding music.

I’d love to hear your thoughts about scales and arpeggios. Are they something you avoid at all costs, or have you cultivated a love for them? Perhaps you’re still on your journey to becoming a zen scale-master? If you have tips you want to share with others or experiences you’ve found useful over the years please do leave a comment below.

Recorder tips from the real world

We like to think we’re all unique individuals, tackling life in our own special way. But anyone’s who’s worked as a teacher knows this is only partly true. Yes, everyone has a different character, but when faced with a class of pupils you quickly learn there are mistakes that everyone makes.

Photo by Dayne Topkin

I spend much of my working life coaching groups of adult musicians and, while each ensemble is unique, I find myself offering certain key pieces of advice to every one. Many of of you will be familiar with Walter Bergmann’s Golden Rules for Recorder Players - if you’ve been following the Score Lines blog for a while you’ll probably seen them in my first post, back in September 2021. While his advice is encased in pithy sayings I feel absolutely sure each one is founded upon an experience Walter Bergmann had while coaching amateur musicians.

Several people have suggested I share some of my own ‘Golden Rules’ here, so over the last few months I gradually jotted things down as they occurred to me. Now I can’t promise to be as witty as Dr Bergmann, but I can promise you’ll find yourself nodding in recognition at some of them as you glimpse your own bad habits.  No doubt others will occur to me as soon as I press ‘publish’, so this may yet become the first in an series of blogs, but for now I hope you may be able to use some of these brief pieces of advice to avoid some of the mistakes we all make from time to time. 

My collection of jotted thoughts fall roughly into two categories :

  1. Aspects of musical notation and how we interact with it

  2. Thoughts about playing style and ways to improve one’s performances.

With that in mind we’ll tackle them in that order.

Useful nuggets of notational advice….

Using language to help with rhythms

Some people find it very natural to translate rhythm on the page into sound, while others need a helping hand. It often pays to think of rhythms like multi-syllable words, rather than taking each note on its own, and words can help you remember the way these groups of notes work together. For some reason many of my phrases have a culinary feel. Quite what that says about me and my relationship to food is debatable, but it works for me! Here are some of my favourites, but don’t be afraid to come up with your own too.

Rests as silent notes

It’s easy to view rests in music as an absence of sound - a sort of musical black hole from which light, sound and matter cannot escape. I would argue a better approach is to consider them simply as silent notes. Play or sing through the following phrase and consider where the rests occur. RETYPESET MUSIC - PITCHES WRONG!!!

If you consider the rests as holes in the music, it’s tricky to know where to place the next note. But if you feel them as a silent notes - one which has shape and mass, but no sound - it’s easier to use them as a springboard for the notes that follow. Use this as your strategy when reading music, feeling silences as active rather than passive things and it’ll undoubtedly add rhythmic integrity to your playing.

Feel the dots!

Here I’m talking about the type of dots which appear next to a note rather than above or below them, making them longer rather than shorter.

When reading dotted notes, consider exactly how much extra length that dot adds to the note. Many times I’ve asked children how long a dotted crotchet is, only to hear the reply, “It’s one and a bit beats”. Ah, but how big is that bit?!  Knowing it’s precisely half a beat is important if you’re to place the following quaver with precision.

To place the following quaver accurately you need to feel the beats within the note. For instance this is how I would suggest counting the rhythm below. Actively counting the second and fourth beats creates a springboard for the following quavers. Do this and your dotted rhythms will be precise rather than nebulous!

Iron out the bumps 

If you’ve ever played under my baton you’ll probably know this is one of my pet hates… Assuming you’re following the advice I gave in the point above, you’re now actively feeling the beats within your dotted notes. That’s a good thing, but be careful not to audibly share your technique with the listener through your breath. Often I’ll hear a distinct bump on the dot of a dotted note, or the second note of a tie, rather than a seamless continuation of the pitch. This happens because you’re thinking hard about that inner beat, maybe nodding a little with your head, or feeling the pulse through your breathing muscles. This creates a lumpy sound which isn’t attractive and it’s an easy habit to get into. To find out if you do this, play a short passage with your eyes closed, or perhaps even record it and listen back dispassionately (the voice recording app in a smartphone can be handy for this) and you’ll hear it as others do. Once you’re alert to this bad habit it’s easier to avoid and your playing with sound much smoother.

The last will be forgotten first….

Playing in extreme key signatures is a rare occurrence in recorder music as our repertoire seldom ventures beyond a couple of sharps or flats. Of course, if you have a penchant for unusual key signatures, you’re welcome to explore L'Alphabet de la musique by Johann Christian Schickhardt which contains a sonata in all 24 keys! One thing I’ve noticed over the years is the way musicians, when faced with multiple flats or sharps, will almost always forget the last element of the key signature first. This rule seems to apply regardless of the key, so in E flat major the first flat to be omitted will be the A, and in E major it’ll be the D sharps that are forgotten first. I’ve no idea why this is, but I guess there’s something about the way our brains assimilate new information which must govern this. Whatever the reason, you now know to be wary of the last sharp or flat!

Short just means short

If I had a pound for the number of times I’ve had to remind recorder players about the true meaning of staccato I’d be remarkably wealthy! So often I hear recorder players beating the living daylights out of staccato notes, with a force worthy of Norman Bates in the film Psycho. But look up staccato in any Italian dictionary and you’ll find it simply means short or detached. Perhaps you want to make the conductor realise you’ve seen the staccato markings and are implementing them, but if you don’t want to offend our ears, please don’t make them heavily accented too! 

Short is a relative term

Following on from my last point, it’s worth noting that staccato doesn’t necessarily mean you should play the notes as short as possible. Instead, consider the context of your staccato notes. Quavers in an Allegro movement may indeed need to be very short, but staccato crotchets in an Andante may need to be more generous. If you like rules, perhaps aim to play notes about half the notated length as a starting point. But do listen to the result and see if it feels appropriate to the musical context. The mood and character of the music also has a bearing on the composer’s intentions and the acoustic of the room where you’re playing may come into play too. In the dry acoustic of a carpeted room staccato notes may need to be more generously proportioned, while a voluminous church acoustic might demand super-short notes because the echo will instantly lengthen the sound.

Just how long is a long note?

I often ask students how many pulses they need to feel while playing a minim, and about half of them plump for the wrong answer. Yes, a minim may be worth two beats, but where do those beats start and finish? Imagine your phrases ends with a minim, followed by a silence. That silence begins at the start of the third beat, which means the note before it should continue until the very end of the second beat. This means you must be aware of three beats when playing a two beat note if you’re not to short-change your listener. This principle applies to any long note which is followed by silence - unless, of course, your conductor tells you to do otherwise!

The arrows show how long each note sounds in relation to the beats of the bar:

Playing with style and panache

Just wiggle your fingers and blow!

If you’ve played under my baton at some point there’s a good chance you’ll have heard me utter this phrase. It may sound glib, but there’s a good reason for it. Once before I wrote about the human desire to play music perfectly, or else we’re somehow wasting our time. Now don’t get me wrong, striving for perfection is an admirable trait, but it can also tie you up in all sorts of knots. That determination to fit all the notes in can slow you down, bringing a stilted quality to the music. Sometimes you just have to throw caution to the wind, chuck your fingers onto the recorder and see what happens. It may not be pretty, but there’s a pleasure to be derived from playing with abandon and you might discover a level of fluency which surprises you. If nothing else it’ll reveal where you need to apply more focus in your next practice session.

Perfect your recorder player’s sulk

To create a warm, relaxed sound on the recorder you need to be relaxed too - any tension will soon be reflected in your tone. Before you start playing, take a deep breath and exhale with a deep sigh, allowing your face and throat muscles to go loose and floppy. Aim to retain this lack of tension as you play - allowing your face to adopt what my recorder teacher called a ‘recorder player’s sulk’. Smiling or frowning engages more muscles, creating a degree of tension in your face which can easily travel to your throat. For more tips on producing an open, relaxed tone why not take a look at the post I wrote about tone here?

Don’t forget to blow

When you consider all the things we have to think about while playing the recorder, there’s a lot of multitasking involved - reading notation, breathing, tone, fingering, articulation and more besides. As we become more proficient we learn to juggle these competing tasks, but every musician has limits. When I’m working with adult recorder groups I see this firsthand in two situations - when the music suddenly becomes much busier, or when the players are faced with lots of unusual accidentals. At these points both the quality and quantity of tone often suffer because the players’ brains are instantly distracted by the need to tongue more quickly or to interpret the notation swiftly. I’m afraid I don’t have a magical solution for this one, but self awareness is a powerful tool.

Next time you’re faced with an unexpected flurry of semiquavers ask yourself if your tone quality has suffered because you’ve forgotten about the need to support your breath momentarily. If your recorder is beginning to sound like a wheezy donkey you know what you need to do!

Play with positivity

If you lack confidence it’s tempting to play more quietly, believing you can hide among the massed ranks of players in your local recorder ensemble. In many walks of being a shrinking violet helps you blend into the crowd, but sadly this isn’t the case with recorder playing.

When instruments are manufactured they’re designed to be played at a specific pitch, so each note rings out at the right frequency. In contrast, when you under-blow some notes will sound flatter than others and many of the highest pitches simply won’t sing reliably. Added to that, your tone will be weedy and undernourished. The result? Your playing will stand out from the crowd much more than you intended, and probably not in a good way! It might sound counterintuitive, but use a firm, well supported breath pressure and you’ll find it much easier it blend in.

I often use the word gumption in relation to playing with positivity. What do you think of if someone is described as having gumption? In my mind it’s a person who has a positive, can-do attitude, who will go for it and make things happen. You won’t find them cowering timidly in the back row. Have this in mind as you play your recorder and I bet you’ll make a more confident sound straight away. 

Make your mistakes with style and panache!

Following on from my encouragement to play with gumption, you might be thinking, “But what if I make a mistake? Everyone will hear it!” Yes, that might be true, but we learn from our mistakes, so being able to hear you’ve gone wrong is no bad thing. Tentative recorder playing often leads to a mushy rhythm as you gingerly dip your toe into new musical waters. In my book mushy rhythms are never a good thing! It’s much better to play with positivity (gumption) because your tone and rhythm are both likely to be improved. You’ll also hear your errors more clearly and be in a good position to correct them. Now I’m not advocating making loud and proud mistakes in a concert situation - by that stage you should have practised the music enough to iron them out. But when rehearsing, own your mistakes and make them with style and panache!

Give yourself an improvement target

A strategy I’ve tried recently is to set ensembles a target when we’re rehearsing. For instance, I might ask the tenors to project their sound 56% more so a melody cuts through the texture, or perhaps I’ll instruct the contrabasses to play their staccato notes 48% shorter. The precise figure rarely matters (although a very specific number often elicits a chuckle from the musicians) but the simple act of providing a target usually puts us on the right musical path. Try this in relation to a specific task when you’re practising and you might find it does the trick. 

Tuning trumps dynamics 

The recorder may have a limited dynamic range compared to many other instruments, but it’s still entirely possible to play expressively. For really convincing dynamic contrasts alternative fingerings play an important role and I plan to write more about this in a future post. If you’re not yet comfortable using different fingerings for loud and soft effects it’s tempting to use breath pressure to create these contrasts. Yes, slowing the flow of your breath will make the notes quieter, but go too far and your intonation will also become flatter.

When faced with an extreme dynamic changes in a piece of music by all means experiment, but ultimately I would argue that intonation is more important than dynamics. It’s all very well playing an exquisitely soft passage, but if you leave your listener squirming uncomfortably in their seat because the music is painfully out of tune that positive effect is greatly diminished! In the long term make a point of getting to know some creative alternative fingerings so you can achieve dynamics and good intonation, but remember this will probably need to be a gradual process.

The holy grail of recorder playing - a true legato

One thing which will make you stand out from the crown as a recorder player is being able to sustain a genuinely legato melodic line, with a well supported tone throughout. If you can cultivate a rounded sound while playing with articulation which is super-smooth you’ll bring a new level of expression to your melodic lines.

The words I come back to time after time are singing and fluidity. Aim to sustain your breath and create a sense of connectivity between the notes, just as you would when singing a hymn tune, and you’ll be well on your way. Think of the breath you put into your recorder like a stream following a crease in the hillside and that’ll help you sustain right through a phrase.

I’ve written a whole blog about this topic, which you can find here.

Breathing is good!

Once again we come back to the thorny issue of multitasking. Breath is the lifeblood of our sound, yet when we get distracted by tricky rhythms and challenging fingering it’s so easy to forget this fundamental activity. Breathing is a vital thing to do, whether in every day life or playing the recorder, so don’t be afraid to stop, take a good lungful of air, and regroup - you body and recorder playing will thank you!

If you find it hard to make space to breathe while playing why not take a look at my blog in this topic? 

Get a head start with Baroque style

Most modern music is littered with instructions from the composer, showing you his or her creative intentions. In contrast, Baroque music can seem a bewilderingly blank canvas, with little in the way of expressive instruction. Tempting as it may be to just play the notes and rhythms, you’ll achieve a decent basic baroque style by using these simple guidelines.

In faster music (say Allegro or Vivace) look the notation and identify the smallest note values you have (perhaps semiquavers or quavers, depending on the time signature). These should generally be played quite smoothly. Now look for the second shortest note values - these can be more detached.

Bear in mind that this isn’t a rule, but merely a guideline which can be broken. If the second shortest notes are repeating pitches, or leaping around, playing them detached will almost certainly create the basics of a good Baroque style. But if you have stepwise (scale) passage you might choose to break this ‘rule’ and play them more smoothly. Be open to trying different things and  take every opportunity to listen to recordings of professionals playing Baroque music so you can learn from their example.

Be brave - sit in the front row!

Time and again I go to conduct an ensemble and I’m faced with a row of empty seats directly in front of me. Why does no one want to sit in the front row? Do they think I’m scary, or perhaps I’ll ask them to play a solo? Whatever the answer, I’m on a mission to persuade people that the best seat in the house is in the front row.

Ask any school teacher and they’ll tell you they always look to the back row for the troublemakers, but that’s not the reason why I recommend the front row. The recorder is a very directional instrument, so if you’re at the back of a large group (a massed playing session at a festival, for instance) you’ll hear very little of those sitting in the front row. However, those brave souls sitting right by the conductor get to luxuriate in a wash of sound from those sitting behind them. This creates a real sense of togetherness and gives them the confidence to play to the best of their abilities. Even better, if your ears aren’t as good as in your youth you’ll find it much easier to hear the conductor’s helpful advice. Go on, making it your new year’s resolution for 2024 to sit in the front row and find out for yourself that it’s the best seat in the house!

Eliminate the chiff

When we first learn the recorder we tend to start with a small instrument - perhaps a descant or treble. As we progress we expand our horizons, often trying larger recorders - perhaps the bass or even bigger. It’s easy to assume the techniques we used on the descant will work just as well on the low instruments but some of them need a little modification. I’m thinking specifically about tonguing. Using strong articulation on a descant recorder will often do little harm, but the same level of attack on a bass can create a very explosive sound - often known as chiffing. Think of the sibilant sound you hear when a steam train sets off. A nostalgic sound at a heritage railway, but in the context of a recorder orchestra it can wreck the mood and destroy any semblance of a legato musical line! 

Yes, there are places where this percussive effect may be desirable, but you do at least need to be able to turn it off at will. My advice is to make the gentleness of your tonguing inversely proportional to the size of recorder. On a contrabass you tongue should make the softest of contacts with the hard palate in your mouth, keeping further back from your top teeth, so it imperceptibly interrupts the airflow. Most importantly of all, listen critically to your playing and ask if your articulation sounds appropriate to the musical style. If the answer is no, you need to do something about that!

Make your intentions clear

My final thought is one that occurred to me while teaching online during the pandemic. Clarity is often lost via this medium, but I’ve since found the following a useful concept in person too.

Many of us were brought up to be well mannered we’ll have an innate worry about being tasteless and over the top, Being polite is one thing, but sometimes you have to exaggerate ideas to get your point across. Think of actors on stage. Instead of speaking as we would in conversation, they amplify their gestures and tone to project to the whole theatre. Don’t be afraid to do the same with your recorder playing. Whether you’re using varied articulation, contrasting dynamics or changes of tempo, you need to make your intent clear. In a concert situation, only a proportion of your gestures will reach your audience who may be sitting a long distance away. 

My advice is to imagine your listener is sitting with a copy of the score in front of them, pencil in hand. If your performance has sufficient clarity of intent they should be able to listen to you and annotate the music to reflect what they’re hearing. You could even test yourself by recording your playing and listen back with a clean copy of the score in hand.  Could you honestly notate the details you hear? If the answer is no, you know what you need to do! 

~ ~ ~

No doubt I’ll come up with more ideas in the coming months, but that little collection should give you plenty of food for thought. Are there other topics you consider regularly when playing, or gems of knowledge you’ve picked up from other teachers? Why not share some of them in the comments below - it’ll be fascinating to learn from each other’s experiences.

The pencil is mightier than the sword

Why a simple pencil could help you become a better musician.

Admittedly the author Edward Bulwer-Lytton may not have had music in mind when he coined the phrase, “The pen is mightier than the sword” in a play about Cardinal Richelieu in 1839, but I hope he wouldn’t mind me purloining it for educational purposes! 

Are you a musician who always keeps a pencil on their music stand? Or are you the sort who thinks, “I’ll remember that!” when the act of going to find a sharp pencil feels like too much hassle? I’m definitely the former. In fact I always have a pencil with me (there’s even one tucked away in my camera bag) on the basis that I never know when I’ll need one, and a pen’s marks have too much permanence. I’ve long been a great believer in using a pencil when I’m practising or rehearsing, because I know only too well how fallible the human memory is. 

Let’s take a quick look at the nature of how our memories work first, as it’s relevant to the way we learn music.

Neurologists differentiate between short term and long term memory, but what does that mean in practice? Short term memory is the transient storage of information - for around thirty seconds; perhaps up to a minute. It’s generally thought we can hold up to about seven items of information in our short term memory and beyond that new information quickly displaces the older items. 

If we wish to retain information beyond the limits of our short term memory we need to use other strategies to reinforce those memories. Saying the information aloud or mentally repeating it to yourself will often work. When I’m playing or conducting I might notice a mistake I want to come back to. I know I’ll probably have forgotten the detail by the time we reach the end of the movement, so I have to find a way to retain the location in my mind. Speaking aloud mid-flow isn’t an option, so I’ll quickly search for the bar number and this helps me at least remember where the passage was when we reach the end of the piece! 

Of course, if we only had short term memory we’d be in trouble. Luckily we have the ability to lay down long term memories - the human equivalent of saving data to a computer hard drive. It’s this mechanism which allows us to remember information and events over long periods. Some of the information we store is vital to our lives (where we live, or our partner’s birthday, for instance) but it also allows us to store all sorts of other detritus. I’ll often hear a song on the radio and I’ll be able to picture where I was when I heard it last - sometimes years ago. That’s of very little practical use, but it’s a knack I seem to have, for better or worse! 

Because our short term memory is so brief, that means we’ll sometimes need help remembering musical details - and that’s where your pencil comes in. When practising we repeat phrases to help our brain and fingers transfer this activity to long term memory, but we need to ensure we practise these phrases correctly and lay down accurate memories rather than practising mistakes into our performance. I’ll often use my pencil for exactly this purpose. I work on the basis that if I’ve made a mistake more than once I need to write something in to remind myself and prevent it happening a third time. 

There’s no shame in using your pencil

I played in the Phoenix Recorder Orchestra for ten years, during which time Steve Marshall was the ensemble’s music librarian. He would see all the parts handed back after a concert and was fascinated to compare how much or little different players had written in their music. Steve would often comment that my music usually had many more pencil markings than anyone else’s. As the single professional recorder player in the orchestra, he mused that if I, as someone who could probably sight read most of the music largely correctly, needed to write things in everyone else definitely did! Ultimately, there’s absolutely no shame in using your pencil. Writing reminders in your music is not an admission of failure, but it does show you’re serious about not making the same mistakes every time! 

The joys and pitfalls of other people’s markings 

When you’re handed a piece of music which already contains markings from other musicians, do you rub your hands in glee or are you overcome with a feeling of dread? Undoubtedly, notes from other musicians can be helpful - they give you a head start and warnings about likely pitfalls. Of course, that’s assuming they’re correct. When faced with music which has already been marked up, approach these annotations with an open mind. I often discover parts in my own library which have been incorrectly marked and that can be destructive. If you find an incorrect marking don’t just leave it there - grab a rubber and either remove or correct it - that’ll help you and the players who come after you! 

The other charm of pre-marked parts can be the non-musical information they occasionally contain. I’ve seen orchestral music with phone numbers, doodles and even whole sentences of prose written on them. I’ve never yet rung any of the phone numbers, but I often wonder what might happen if I did! 

Pick the right tool

Hopefully I’m on the way to convincing you why you should always have a pencil (never a pen!) to hand, be it in rehearsals, lessons or just practising at home. But what sort of pencil should you use?

There are many options but the most important things is to choose one with a soft lead. A 2H pencil is no use to any musician and, in my opinion, should be banned from all musical instrument cases! A hard pencil will likely leave indentations in the paper and the writing will be difficult to erase. A soft pencil (2B is a good choice) will allow you to write quickly and lightly, as well as giving you the option to come back and change your mind later. 

If you’re someone who never remembers to sharpen their pencils, a propelling pencil can be handy. This was my choice for many years, paired with thickish 2B leads -  usually 0.7mm. I’d keep a tube of spare leads in my pencil case and never faced the frustration of a blunt pencil - just click the end and you’ve got a fresh supply of lead. 

More recently I’ve returned to traditional pencils and my favourites are currently Blackwings. They’re not especially cheap, but they have lovely soft lead, sharpen beautifully and their erasers actually remove markings effectively. One of my bugbears with many pencils is the way the rubber on the end just smears the graphite around, leaving an unsightly and permanent smudge.

As I’ve just implied, the other vital tool in your armoury is a good eraser - after all every musician is entitled to change their mind. If your favourite pencil has a rubber which doesn’t actually do its job, make a point of finding an eraser which works effectively - you won’t regret it. The rubbers on Blackwing pencils can be extended as they wear down, and you can even buy replacement ones which slot into the ferrule on the end if you use up the eraser before the pencil becomes too short to write with - a feature I’d never come across before.

What should you write in your music?

This is one of those questions with an infinite number of answers, but here are some of the things I mark in my own music. My conducting scores contain lots of additional scribblings, but let’s focus on playing today. There are the obvious things, such as breath marks, accidentals, dynamics, alternative fingerings and ornaments. But there are many other things you can mark in too.

An 18th century custos at the end of each line in a Sammartini Sonata. Click to see enlarged.

I’ll sometimes use my pencil to mark in a custos at the end of the line - that’s a little squiggle which shows the pitch of the first note on the next line. These often appear in old publications and can be handy if the music doesn’t go where you’re expecting it to. In a similar vein, I’ll sometimes highlight a moment where a musical sequence changes with a circle. If you’ve had a regular pattern of notes for a bar or two, a subtle change can be easy to miss. 

Pencil markings can also be handy as reminders about the progress you’ve made in your practising. I’ll often write a small box around note groups which need further attention. This reminds me the next time I practise, but also gives me a heads up to concentrate harder at that point in rehearsals and concerts. Once I’ve nailed the passage reliably I’ll rub the box out and remove the distraction. If there’s a longer passage (may be two or three lines) which need closer attention I‘ll sometimes write a line in the margin at the side instead, so I don’t end up smothering my music in pencil!

Here I chose to add a line in the left margin to remind me this passage needed practice to tidy up my fingering

If I’m gradually working something up to a faster speed using my metronome, I’ll often note the maximum tempo I’ve achieved at the end of a practice session. Then, when I return to it I’ll know where I’d got to. Often I’ll need to backtrack a notch or two, but it’s a handy way to track my progress.

Another time I’ll use my pencil is when I’m trying to decide on alternative fingerings or ornamentation. There’s one piece of Vivaldi we play with The Parnassian Ensemble with a passage where there are many places I could use an alternative fingering, but the benefit isn’t always immediately obvious. Having too much choice can be paralysing, and as we learnt it initially I found my indecision about where to employ an alternative tripped me up. My solution was to make a decision and write it in my music - simple! Yes, I then changed my mind about a couple of notes, but it was easy to amend those markings, and the result was a much more fluent line.

Create your own language, but be clear!

Over time you’ll probably create your own language of symbols for the things you write in your music most often. There are of course universally understood symbols such as sharps, flats and naturals which all musicians use - or so I thought… Many years ago I took in the orchestra music after the students’ concert at the Recorder Summer School. To my astonishment one of the treble players had carefully written the word ‘natural’ in longhand over every place where an F sharp wasn’t needed. Maybe that’s what he or she needed for the message to sink in, but there’s definitely a more concise way of notating a natural note!

The most important thing is for your symbols to mean something to you and to be clear. Don’t write something terribly cryptic in your music, only to realise you have no idea what it meant when you come back to the same piece the following week! In my own music, I’ll write the word ‘BIG’ over a tick if I need to take a deep breath - it’s clear and unsubtle enough to make me do what it says. Passages where I want to take some extra time will be decorated with a wiggly line, and if I need to be more aware of another player or a conductor I’ll draw a small pair of glasses. Nothing ground breaking there, but I know what they all mean and that’s the key reason for writing on the music in the first place.

A glimpse of my annotational world…

While researching this blog I had a good old rummage through my music library in search of examples I could share with you. In the examples below you get a sneak peak at what goes on in my own music, but please understand some of it isn’t pretty!

This example shows my unsubtle ‘big breath’ marking, along with an indication of the length I wish to play the appoggiatura. With a dotted note like this, the appoggiatura could be performed as a quaver or a crotchet, so this pencil note tells me I’ve decided to play it as a quaver. I can of course change my mind and amend the markings later if I wish to. Incidentally, I always mark breaths with a tick. Some musicians use commas, but I personally find those too easy to ignore, especially without my reading glasses!

In this snippet I’ve added a simple curved line. A passage like this is at risk of being played non-legato because of the flats and the leap up to a high D - the line reminds me I really must play it smoothly. Some musicians will instinctively play a slur when faced with a curved line like this, but I know what I intend as it’s a marking I often use. If I wanted a real slur I would place the line more precisely rather than using a quick sweep of the pencil.

Below we have my way of marking in alternative fingerings. Some players use ‘II’ instead, but ‘alt’ works just fine for me.

The letters over the music here are from when I loaned my music to a pupil, but I’ve been known to use this indication myself too. The T is simply a reminder to tongue the note - something easily forgotten amid a flurry of trills and demisemiquavers.

Here we have a couple of markings to indicate rubato - being flexible with the time and rhythm. The wiggly line tells me to stretch the notes out a little - in this case a small ritenuto leading up to the pause. The word ‘time’ over the breath mark, however, is a reminder not to rush on after the pause. How much time I take before continuing may depend on the acoustic in which I’m performing. In a dry room, with little echo, I might move on fairly swiftly, while a resonant church acoustic may require a big, dramatic silence for the impact of the pause to sink in.

These markings date back to my student days and were written in by my teacher, Philip Thorby, but I’ve continued to use these symbols as they work for me. The straight lines (sometimes horizontal, sometimes diagonal, like an acute accent) indicate notes which need weight. The U-shaped symbols are similar to those used in poetry when analysing the flow of the text, and tell me to keep them lighter and stress-free. These marks may not be obvious to other musicians, but after 35 years of writing them in my music I know exactly what I intend.

Sometimes I see people writing small essays in their music and I wonder how on earth they’ll read it all in the heat of the moment. My approach is to find a single word which encompasses the character or mood I’m aiming for, so I can take it in with the swiftest of glances - as I’ve done in this example.

How much is too much?

Judging exactly how much to write in your music is a bit of a balancing act. Leave things out for fear of cluttering the page and you may omit critical information. But if you cover the page in annotations it can be difficult to see the wood for the trees!

The example below is one of my more prolific annotations. There are the usual articulation marks and dynamics, but also some character related words, such as ‘more butch’(!), ‘very calm and still’ and ‘naive’. On the Grave you’ll notice I’ve made some decisions about how I wish to ornament the music, along with an indication below the stave as to which chords are being played in the continuo part. These harmonic markings are a combination of pitches and figured bass which works for me as I’m used to playing from figured bass, but may not help non-keyboard players!

This is about as extreme as my own pencil markings ever get - any more than this and I know I’ll begin to ignore some of the symbols because my brain can’t process it all quickly enough. Not all musicians are the same though, and in this example of a Bach Violin Sonata, annotated by Yehudi Menhuin, there’s barely a scrap of paper left untouched!

Another example by an internationally acclaimed performer which surprised me was the edition of Bach’s Goldberg Variations which pianist Glenn Gould used for his 1981 recording of the work. The music was discovered and auctioned off by Bonhams in 2018 (you can read more about it here) and it gives a fascinating glimpse into his thought processes. You can click on the images below (and any of the others in this post) to see them in more detail. Personally, writing on music in pen like this makes me shudder, but Gould was an eccentric character and this approach evidently worked for him.

Are you indecisive?

If you’re still working out how much annotation is right for you there are other ways you can experiment.

The obvious one is to make a few photocopies of the piece you’re learning. You can do this legally for study purposes, providing you own the original. With these you can try different markings and see what works best for you, before transferring your final annotations into the published edition.

Maybe you’re someone who responds well to colour coded markings? I’m not a fan of writing on music with coloured pencils or pen as the marks can’t be erased or changed later. One solution is to insert your music (or a copy of it) into a clear plastic sleeve. You can then write on the sleeve with coloured dry erase markers in the knowledge that you can rub off anything which doesn’t help.

There are even options available for musicians who would prefer to store their music on an electronic device rather than carrying around weighty paper tomes. I’m still relatively new to this approach, but I do use the forScore app on my iPad sometimes. The app allows you to store vast quantities of music on your device and you can annotate it with a stylus, saving different versions if you wish to. I use this mostly for proof reading scores I’ve typeset while I’m on the road, but I know several musicians who use an electronic tablet to rehearse and perform from.

Eight quick annotation tips

  1. Don’t be afraid to change your mind. Music making should be a fluid affair - your interpretation can and should evolve over the years. Do write helpful markings in your music, but don’t be afraid to erase and update them as your taste changes.

  2. If you have lessons with a teacher, don’t rely on them to write things in for you. They may well do so, but if you think of something which will help you play better, grab the pencil and do it yourself!

  3. Be ready to adapt your decisions. Playing in a different acoustic or working on an ensemble piece with new people may mean you need to change your markings - be flexible and willing to change if need be.

  4. If you take music grade exams you don’t need to rub all your markings out before the exam. The examiner almost certainly won’t even look at your music and if your annotations help you to play better why make life harder by erasing them?

  5. If you mark a passage as a reminder that it needs more practice, don’t be afraid to rub out the annotations when you’ve overcome your stumbling blocks. You may find them helpful still, but on the other hand you may find them an offputting reminder of your earlier failings!

  6. Don’t be precious about writing in your music. Doing so isn’t an admission of failure, but will help you avoid mistakes in future. Music is a tool rather than a priceless work of art.

  7. Be a thief! Analyse the markings you see in other people’s music. If you spot a symbol which makes perfect sense to you and might be useful, don’t be afraid to ‘borrow’ it!

  8. If you’ve made a mistake more than once, strongly consider writing something in your music. This is a rule I follow myself. Missing an accidental when sight reading is unfortunate, but human. Forgetting it the second time round means I might well miss it again in future so I know I should pencil it in before I play the music a third time. This way simple mistakes don’t turn into bad habits, which are much harder to eradicate.

Musical annotations as a snapshot in musical history

While researching this subject I came across a short video from the British Library about the importance of annotations in historic music editions. Now I’m not suggesting your copy of Telemann’s recorder sonatas will necessarily be of critical importance to musicologists in a century’s time, but clearly there are things we can learn from old scores and the trail of pencil breadcrumbs their owners have left for us!

Have I convinced you yet?

I often tell the groups I conduct that the clink of a pencil returning to the desk of a music stand is one of my favourite sounds. This sounds crazy, but as a teacher I know that if a student has written something in their music they’re more likely correct their errors next time round and that’s got to be a good thing!

If you’re someone who always has to borrow a pencil from a neighbour in rehearsals, perhaps my words may be enough to inspire you to pop one in your instrument case, so you’re prepared next time you need one. I’d love to know your thoughts on this. Are you an enthusiastic scribe, or does your music tend to remain as untouched as a fresh fall of snow? Please do drop a comment below!